23 Nov 2019

Back from the Dead

PoTD mod
“Back from the Dead”


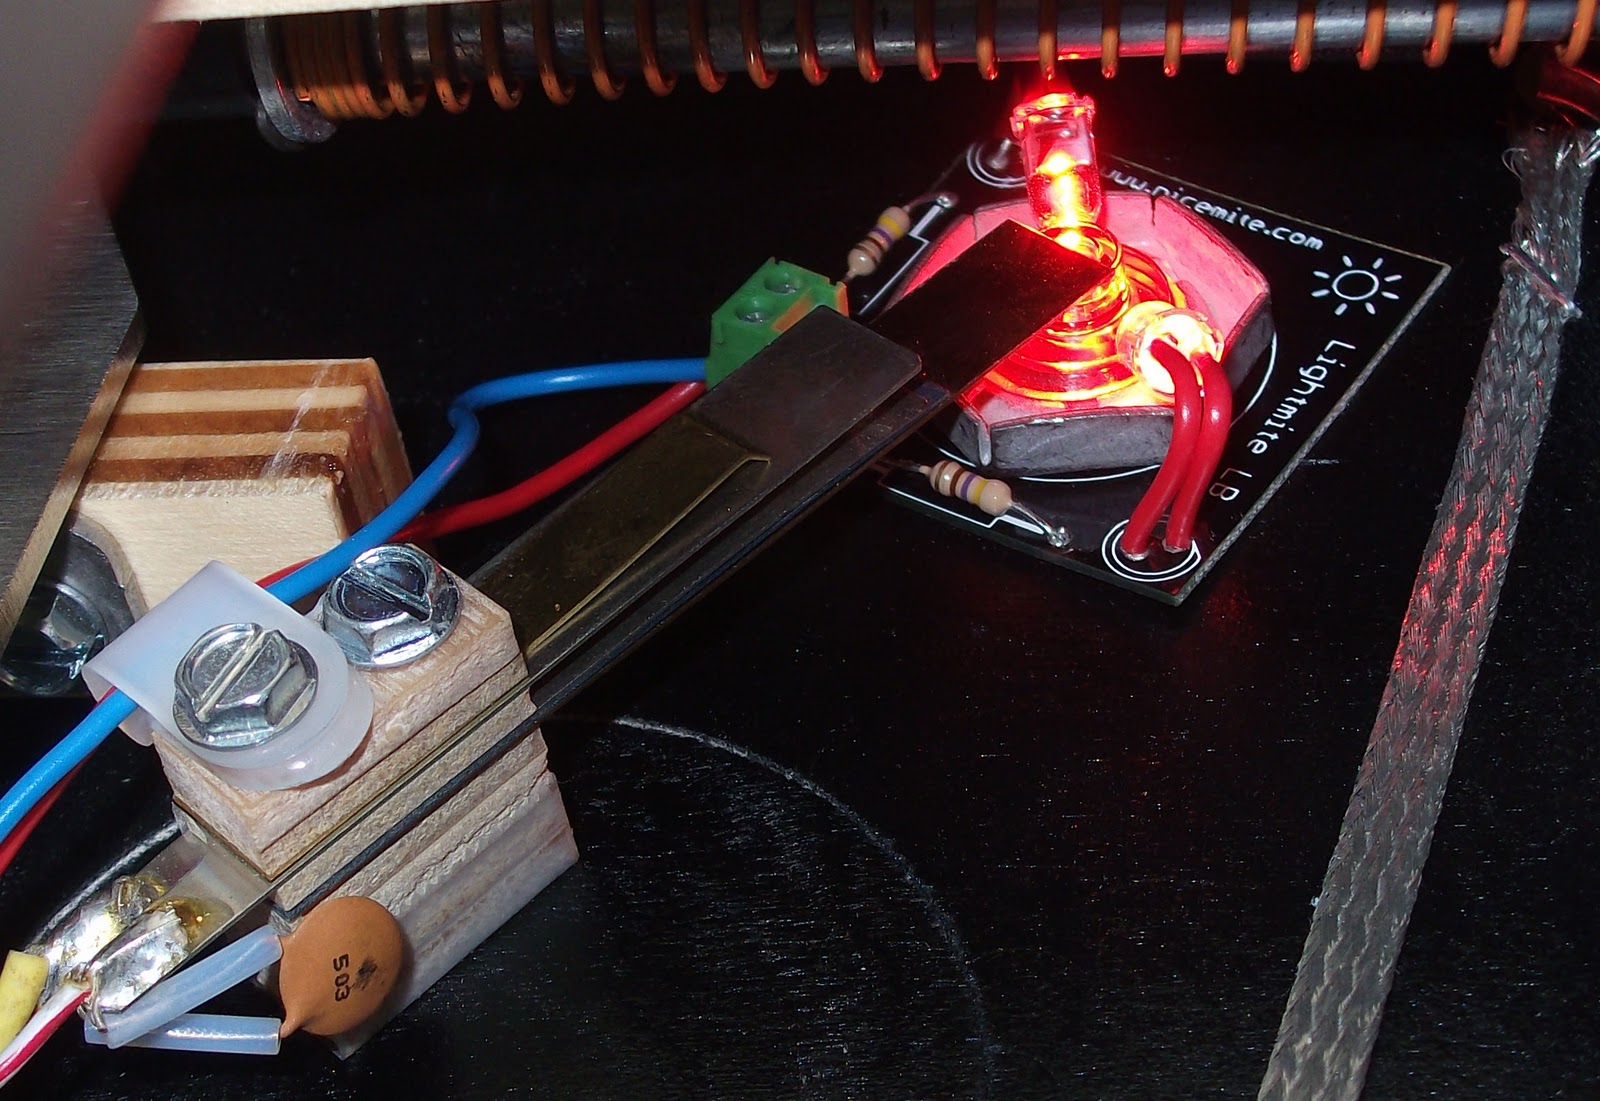
Yes, this has been done before, searching online I’ve found stuff from 5+ years ago, with the figures lit solid & also tied into the 1-2-3-4 lights.  You can also buy an assembled pinball mod. 

I wanted to make my mod flash with the 1-2-3-4 lights above the path and look like it came in the game. 

As with previous mods, I like it to be completely removable, which means no soldering directly to lamp sockets.  Which makes it harder, but I think it’s worth the effort. That being said, this is one of the most fiddly mods I ever put on a game.  I hot glued figures to the plexiglass board I bought, and the figures would fall off installing it. Or I installed it and one of the green LEDs didn’t work.  But - I got it running & even glued on some tiny skulls I made from beads and painted green.
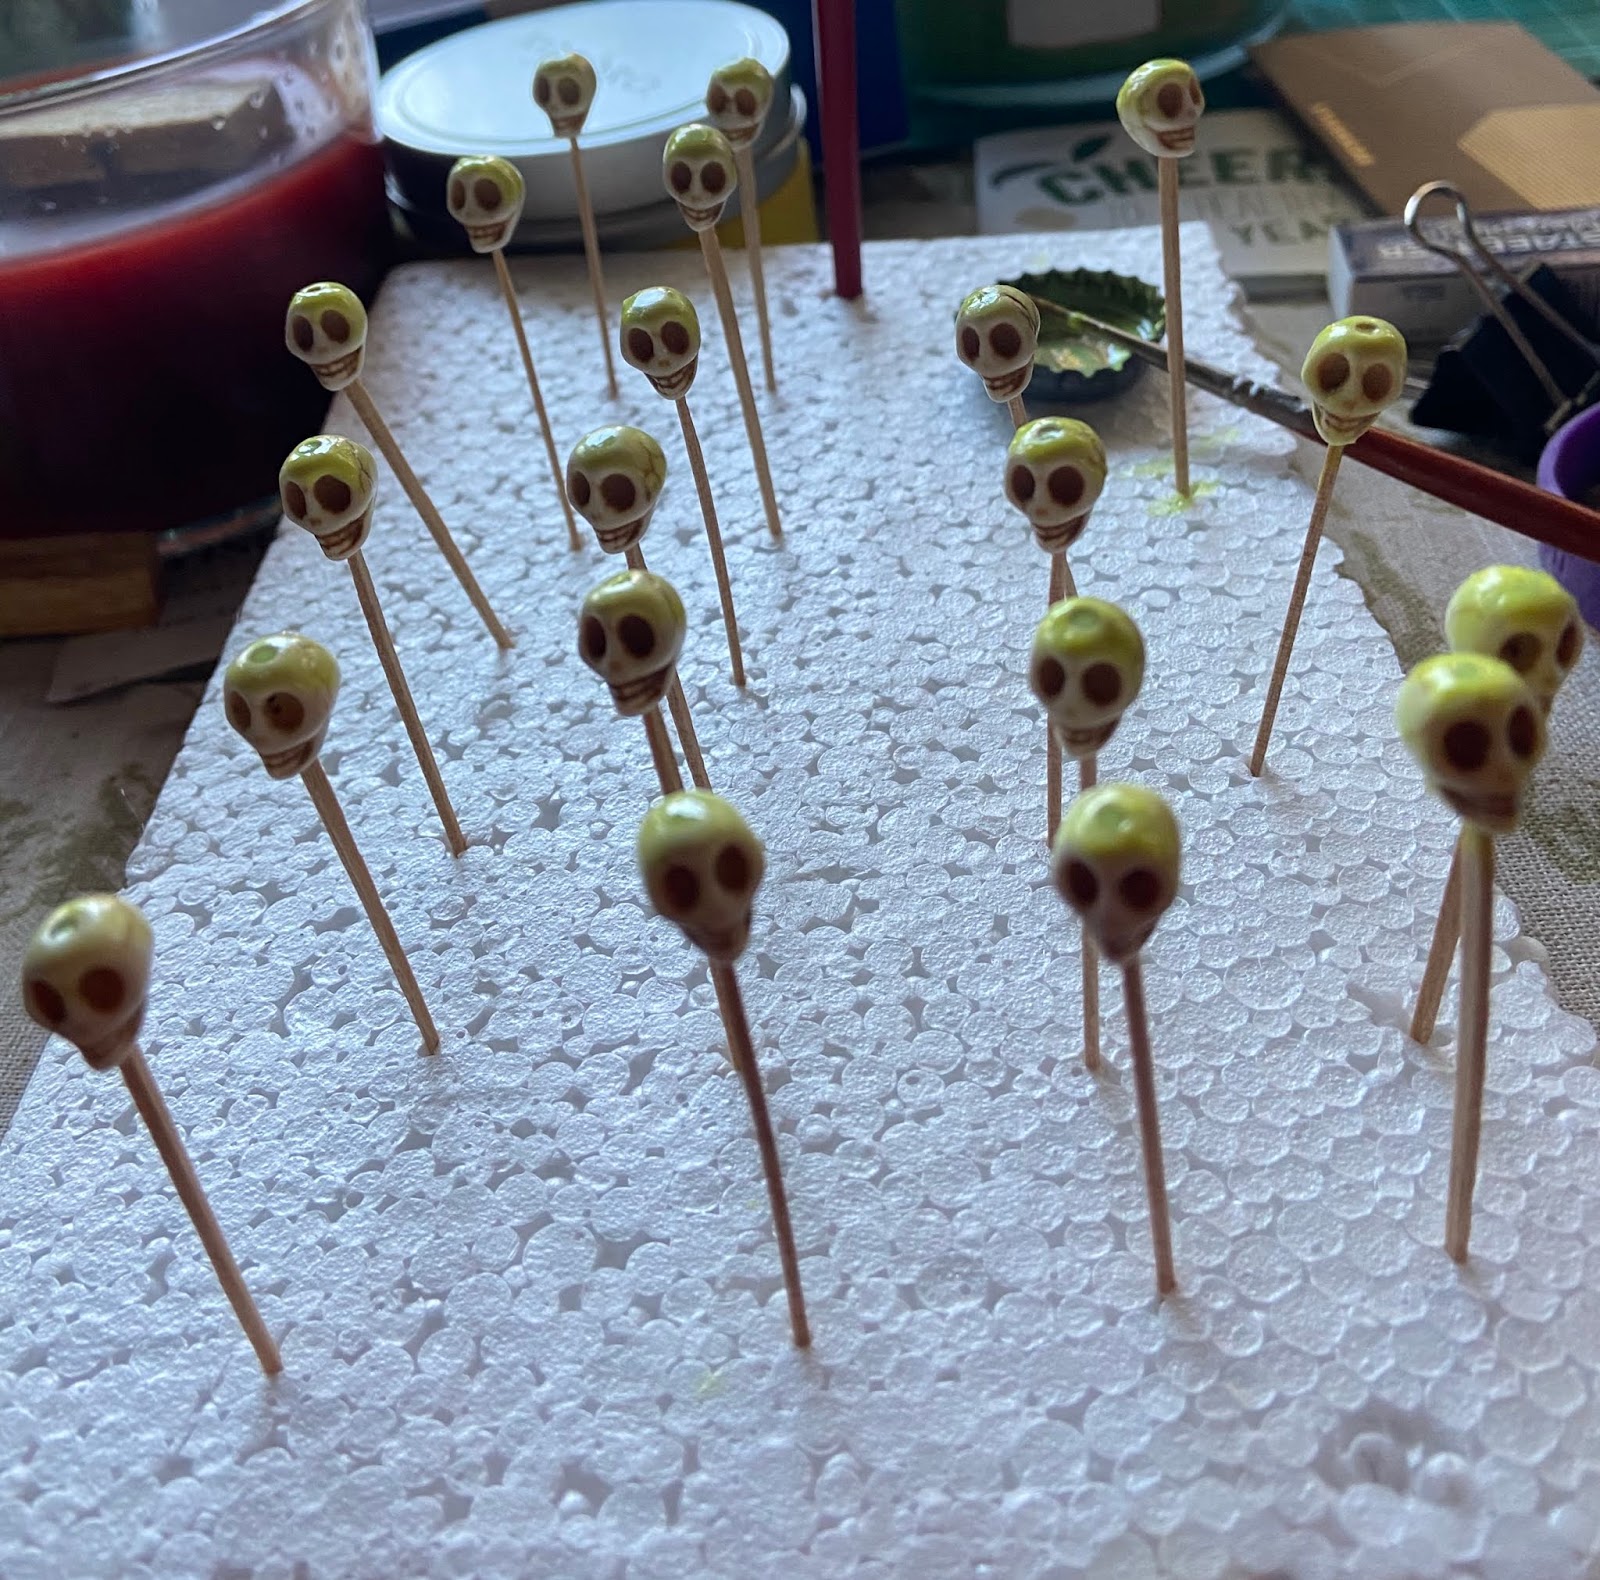

Looks Cool. (See Video link at the bottom)

If you don’t have the patience, Then buy one for $200+. I decided to buy all the stuff and make one myself. I probably spent almost as much if you include my time. Luckily I had most of the hardware in my pinball repair stash. 

Not much out there on how to actually wire it all up, but it’s not that hard from an electronics POV:

Ground is straight through to all 3 connectors.  Then put a diode and Resistor in series between the PoTD Connector and the other two connectors with the band pointing towards your LEDs.  Obviously the two existing connectors are just wired 1:1 Make sure you get the grounds ‘lined up’ when you plug it together. Cut the cable tie behind the backboard PoTD lights and then remove the Z-connector, you won’t need it as the breadboard replaces it’s function.

COL/ROW 
PoTD MOD — Original Input (OI)  — Original Output (OO) 

ROW 9 GND — GND — GND
COL 4 (diode) |<— ~~~~ (220 ohm R) — OI — OO
COL 5 (diode) |<— ~~~~ (220 ohm R) — OI — OO
COL 6 (diode) |<— ~~~~ (220 ohm R) — OI — OO
COL 7 (diode) |<— ~~~~ (220 ohm R) — OI — OO

Connect the 4 LEDs to two wires each, the Cathode (-) is the short leg and connects to ROW/GND.  The Anode (+) is the long leg and goes to the COL /Drive. That should work.
All the GND wires can be bunched together and wired to the same Pin on the connector.

*You may need a different resistor value depending on your LED type.  If in doubt, google is your friend and use an online calculator.  You NEED a current limiting Resistor.  6v is probably a good nominal voltage to use, the diode drops around 0.7v.  LED desired current is probably around 20mA, but if you have specific info for your LEDs then use that.

Warning: I have an LoTR LE so some of your wiring colors may be different.  So I’ll give both.

On my LoTR LE to POTD bulbs:
Row (GND)
9 BR/BLK (Brown with Black Stripe)

Column (18v)
4 U.L. (Lamp #60)-  King - YEL/BLK 
5  U.R. (Lamp #61)- Warrior - Grey/BLK
6   L.L. (Lamp #62) Warrior - YEL/BLU
7   L.R. (Lamp #63) Warrior - YEL/VIO


On an original LoTR to POTD bulbs:
Row (GND)
9 Red/White  (Red with White Stripe)

Column (18v)
4 U.L. (Lamp #60) -  King - YEL/BLK 
5  U.R. (Lamp #61) - Warrior - YEL/GRN
6   L.L. (Lamp #62) - Warrior - YEL/BLU
7   L.R. (Lamp #63) - Warrior - YEL/VIO


So here’s a parts list:

2 AOME “Army of the Dead” sets.  You’ll have two extras if you can’t find singles. 
I paid $15 for three used figures and $45 for a NIB set.  Total: $60 shipped.
1 x Plastic to mount them on above the ball path. One option is from Pinbits.com and costs $24. A cool option with printed skulls and other options is from Robert (pixmanohio on Pinside.com).  $49.50
4 x Light Green LEDs.  I used bare 5mm and like them better than UV or another color.  Had them on hand. 
3 x .156” 5-way headers with square pins.  Buy a 15-way and cut it up, if that’s cheaper.  Buy the kind with the ‘locking pins’ on one side. Had them.
1 x .156” 5-way connector and crimp pins. I prefer this to the ‘insulation displacement’ type of connector.  This is where the LED wires from your mod goes. Had it.
4 x 1n4004 diodes. I put these in as I wasn’t connecting directly to the controlled lights with resistors in series with each LED. Had them.
4 x 220  ohm 1/4W resistors. Had them.
Some wire.  I cut up an old Cat5 ethernet cable, which is handy as you need 4 twisted pairs and they are already paired and color coded for you.
Some  .156” breadboard stuff.  Easiest has 1:1 tracks running between holes.  Had that, too.
Longer screws and two long thin posts.  Had them.  You can get the posts and screws as part of a Pinbits kit, if you buy there. 

So basically, all I bought was the figures and clear plastic mounting base.  Cost: $109.50

You only need to drill out the ‘King’ figure for the LED, as he had a solid base.  The others have cloaks where they can just sit over the LEDs.  I superglued the swords, pikes etc to the figures and hot-glued the figures to the clear plastic.  I used hot glue in case I want to change LEDs or have a wiring problem in future.  I wish I hadn't used superglue to glue some greenish skulls I made from beads to hide the wiring.  It ‘fogs’ the clear plastic with a white haze. . Every fingerprint is ‘developed’ by the superglue and there isn’t a good solution to remove them. 

Videos of my mod in action and the ColorDMD LED Display.  Which I think works really well on this game. 

https://youtu.be/lXGGQ9i4xj0
https://youtu.be/iuYns03aS_k

11 Feb 2013

Thanks Pinball People

As you will know, I haven't been blogging about LOTR pinball lately.  I haven't been playing much either, I kinda lost my mojo, baby. 

But going back after a break, it amazes me how complete the game is.   I'm not as good as I was when I "kept my chops up" as they say in the music business.  But I can appreciate that this game is a classic. The modes and rules are excellent, and it will definitely stand the test of time.

Finally thanks to all the nice people I have met through pinball and by owning this game. My first NIB, and first Stern pinball game.  

It hasn't been without problems, but in the end it has been worth it!  It still looks nice and plays perfectly.  (It should play well considering the effort I put in to make it as good as it could be).

28 Apr 2011

Devising a New Strategy

My game play strategy on LOTR is taking a new direction from today.  
Apologies if you already have  this down cold.  But you still might learn something...

It's based on deferring DTR while you go back to stack a mode and a multiballs together. Seems to get you closer to Valinor (the wizard mode) or at least  gets you higher scores without even breaking a sweat.   But I'll get to that in a minute. 
First strategy is to forget about shots that get the Movie multiballs running in the early part of the game.  At the start of ball #1,  concentrate on defeating  modes.   You will qualify for the Movie MBs along the way, collecting K-E-E-P letters from lanes, fellowship characters and POTD souls. 
If I have a chance to get Boromir from the Palantir, early then I do that.  It's usually the first award offered. Not worrying about the Pop Bumper nest means more control using ramps and less randomness.   You are trying to eliminate variation and not take shots that are risky at this point (early 1st ball).
I usually get modes out of the way that I don't like or that don't combine with other things.  As an example, 
defeating Shelob is hard, because you have to remember the left/right/left/right alternate shots without any clues, and remember which shots you already made on that side.  Not easy juggling 3 or 4 balls.


Another trick is that if you have FOTR qualified and want to start a mode and stack with FOTR, then don't choose a mode that needs a ring shot as part of it.   Why? Because once the Cave troll sequence is over (if you even bother to set that in the settings) then the Balrog comes out and blocks the ring shot.    e.g. Don't start a ring frenzy (or super ring frenzy) and then start FOTR MB either.  You won't be able to score the ring frenzy total.   Unless you can defeat the Balrog and then score the ring frenzy total.  So you stop yourself from gaining the bonus points you worked for so hard.
You set up Gollum Multiball by collecting 9 Man-rings.  A shot to the Gimli hole would activate it, but don't use it just Before DTR, as that's a complete waste of it's power.   You need to activate it right after completing all three Movie MBs, so you want to light it during or just after the last of the 3.
I go in the order (usually) of FOTR MB, then ROTK, then TTT.  That's my preferred order, but sometimes the last two are swapped. 
Completion of the last one with Gollum Multiball lit is perfect.  Then DTR will be  lit, but don’t shoot that ring!  Instead start up the Gollum MB, which lets you go back and start another mode, putting you further towards TABA*
Having  Gollum MB running defers DTR and lets light the Mode Inset, and then you start one of the modes by shooting the ring.  Once you have both Gollum MB and a mode running, then try and qualify and re-start a Movie Multiball if you can. One you didn't beat on the way to DTR is a good choice to make.
Gollum either Hurts (halves) or Smeagol Helps (Doubles) your score.  Just listen for the words 'always helps' and you know it's double score time.  So now If you have the mode running, along with the already running Gollum MB, and a  Movie MB started.  "Stacking" like this can be very beneficial to your scores. 
It’s killer, especially with the x2 as well. 


DTR lights and becomes available again after Gollum MB (and any other MB running) ends.  Made 64Mil without really ever breaking a sweat, and that was without completing DTR.  I drained during the DTR, before making all four “qualification” lanes.  I could easily do 100Mil every time, if I could work out how to beat all the Movie MBs and be able to do the “deferred DTR” trick in every game. 
I suspect the secret is stacking like this: start a mode, then start Gollum MB, and then the right Movie MB for that mode on top each time  If you can.  Some modes work better with some Movie MBs stacked on top.  Some are mutually exclusive! 
My fav combo right now is Gandalf vs. Saruman mode and then TTT MB  you can usually finish the mode when trying to “stay alive” long enough to win TTT.  It’s a “war of attrition”, but the MB is not really that objective based.  So you concentrate on just the Legolas Shot and the Aragorn Shot to the Sword, nothing else,  until the gate opens to Orthanc.   Shoot that, then go crazy hitting as many shots on the game as you know blindly until you drain or win the mode.  I think Gandalf says “I was delayed” if you beat the mode.  If you are still alive, concentrate on finishing the shots to win the TTT MB.  I think you will get two “gifts of the elves” for doing that as well, a  MB win and a mode win.  Same  goes for Warg Battle or Ringraith mode and ROTK MB.  Except the lanes are more defined for ROTK.  You have to know the modes and keep the shots to do next in your head!  But it's not easy. The shots aren't indicated, as the multiball shots are the ones the inserts are showing.  Sometimes you get sound bites that will help, in the case of 'Gandalf vs. Saruman' and the 'War of the Ents' you get the diverter to orthanc opening with a snap.

*You get "There And Back Again" by completing all the modes and then shooting the ring, a great mode.  Scoring is potentially very big as you can earn back the total you made on each of the modes, if you are successful.  


I used to think that DTR was a main objective, and it is in a way if the game is short.  But if you can keep things going, it's just a stop on the way to Valinor.  Here's hoping you (and I) will get there one day.

18 Apr 2011

LOTR Comic Strip

Did this mashup a while back from a well known comic strip.  This was about a secretary stuck trying to  fix a photocopier.  Of course in my version the copier becomes a pinball machine...


5 Apr 2011

Fix for my "Sticky Flipper Buttons"

I found out something new I hadn't noticed before.  Both the Stern flipper buttons as supplied and the  clear lighted ones don't have "e-clips" and the buttons aren't removable to sand or deburr.  I was complaining in my last post that my new buttons were "sticky" and just didn't have a smooth action.  


Well I saw that the old Stern supplied buttons had an "o-ring" something I'd missed when fitting the clear ones.  Moved them over - and the difference is amazing!  Now they seem tighter and more smooth.  The shots are easier to make and the buttons feel "right" again.  Yay!  Lighted flipper buttons can stay.


BTW - Looking in the manual, the correct parts are: 
SPI # 545-5850-00  Description: O-Ring 11/32" x 7/32 " x 1/16" (Flipper Buttons)
I would try to buy them from a good hardware store or o-ring supplier.  Knowing Stern, they probably cost out at $5 each.  :)

4 Apr 2011

Worst Game, Ever!

Haven't been playing the LOTR lately, as I got interested in restoring and documenting my Williams Starlight '84

Also bought a Pinball 2000 game (Star Wars Episode 1) and set about converting it to use an RFM playfiel which had been in storage for years.  Very successfully, I might add.  It's running a hacked code:
v1.8 on RFM and  v1.5 Star Wars -although still running on the original boards and not using nucore.  I bought an extra prism card and CPU board for $100 from someone else that upgraded to nucore. This facilitates swapping, as you don't need to do any game code updates.

Anyway I digress, as usual.  When I got back and played my first game, my skills had been lost.  I scored my lowest score ever (although the game was working perfectly).  I remember it as 5,180,000.  I got better after a few games, but not by much. Compare that to making nearly 150,000,000 in early Jan '11.
So, I had the "worst game ever!"  I hang my head as I enter the into the hallowed "hall of shame".

My only excuse is that the Stern flippers have a really different touch than the Bally/WMS games, and you need to be adjusted to them.  I also think I will blame the flipper buttons!  The clear lighted ones are "sticky" and just don't have a smooth action.  I was hoping this would improve over time, but it hasn't. They may get  reverted back to the original parts that came on the game.  Looks aren't everything in pinball.

BTW:  Added search bar and popular posts gadgets to the blog to make it easier to find things.  It also searches linked pages so you can find links are parts suppliers for the mods.  I also list most of them on a tab called "LOTR Pinball Parts".

 -Richard

8 Mar 2011

Testeroo Testing 1.2.3 Testerooo Testing 1.2.3 Testeroooo Testing 1-2-3-4

I've always wanted to post that online.  I use the phrase Testerooo when testing if google and my Internet is working, and you do get several hundred hits.  Now one gets people to my LOTR blog.

Sorry to spam you if you aren't interested in LOTR Pinball.

OK on to pinball:
I had one of those wonderful games the other day, the mythical "first ball ball would not drain" situation.

I nearly got to TABA, beating some of the modes, Gandalf vs. Saruman is one that I always like to win.  Won one of the Movie Multiballs (TTT).  Got loads of the Fellowship across the bridge in FOTR multiball, and nearly defeated the Balrog.  And all on ball #1 (including extra balls).   I couldn't complete "Destroy the Ring" although I got the 4 lanes and on  to "Gollum has the Ring" probably faster than ever before.  But I drained and would have had  to start all over again.  Still I had 58,000,000+ by the second ball which is good for me.  It was an amazing  game up to the last few balls, I think 5 in all (2 extra balls).  But in the end I didn't get to grand champion.

Some youngster came over and thrashed my LOTR LE and put up a highscore of 181, 760,000
Ken said he didn't get TABA or to DTR, just kept getting Super Jackpots and hitting his shots during multiball.  So there are different ways to play the game.  I tend to be "goal" and "mode" oriented rather than worrying about the highscore.  I played early pinball like that too, preferring to win games on "specials" or the features like "Ransom (in BK2K) or "Deluxe" (in EBD) rather than just points.  But sometimes that comes naturally for you too, when you are already doing well beating the modes and game challenges.

I hate just looping the same shot over and over, rinse and repeat because that is the way to get a highscore on the game.   Although I can see in tournament play why you have to approach things in a clinical way.  I think I'd rather be having fun.

-Richard

18 Feb 2011

LOTR Real Stern/DE Knocker

I had fitted a "homebrew" knocker to the topbox of my LOTR LE almost exactly a year ago, as I hated the sound of the Stern Software knocker.  It was basically a 6v relay driven from the Q24 transistor and the 5v supply.  It then switched ground to a SA2-23-850 DC coil / knocker running at 50v DC.  It was loud enough, for home use.

The knocker assembly was taken from my old 1980's Williams Blackout game which I wanted to rebuild, so I needed the part back.  Although it had worked in the LOTR LE, it wasn't pretty if you looked inside.  It was also starting to arc the contacts in the relay, even though it was rated apparently at 5A and I had tied both of the N.O. contacts together which should in theory help. I also added a cap to try and reduce the arcing, but may have had used the wrong (too small) a value there. It was also running the coil at 50v+ DC instead of the 30v (or so) which that coil was expecting.  So it was time to "re-visit" my mod, and "do it right" to match the quality of parts in the Stern game.  I ordered these items from Pinball Life:

  • Knocker Strike Plate: sp01
  • Data East/Sega Knocker: 500-5081-00
  • Stern 50-Volt Step-Up Driver PCB: 520-5254-00

  • Cost was under $30.  (Not counting shipping charges or a 5 pin .156" connector and some wire, which I had).
    I fused the 50v DC supply taken from the I/O Power Driver board at 4A, using an inline (car radio type) fuse holder.  The ground wire and the "Q24 knocker drive" wire run directly to the mini-board connector.  I terminated those wires on the "I/O Power Driver" side using crimped tag loops. The other two wires are soldered directly to the coil lugs, with the coil diode removed.

    Instructions which are OK, but cover mounting the assembly in the cabinet bottom are found here.  But don't use the plumb bob tilt bracket as a ground!  I'll say that again later.  

    Good points are:  There is a connector for the Q24 knocker drive wire (or ticket despenser) already in the cabinet bottom, violet/grey.  The wiring diagram shown is correct and can be used. It looks like a fairly tidy and functional install.
    I include a picture here in case the above link is broken.  (It was in March 2011).  Board is the Stern/DE 520-5254-00 PCB originally made for WPT and later SAM games.
    The bad points of the install are:  I don't personally like having the knocker located in the cabinet bottom, where the bass speaker and the other solenoids are located. My ears are nearer the backbox.  The knocker is also mounted on a block of wood to avoid the cabinet bevel, but even painted black it doesn't look right to me.  And here's the killer:
     *** Warning *** If you locate the knocker in the cabinet bottom, DO NOT use the plumb bob tilt as a "ground source" as indicated in those instructions. It's not a dedicated switch on LOTR, and is in Column 7 of the switch matrix on LOTR.  You will kill your game if you put 50v DC though the switch matrix!  At the bare minimum you will blow transistor Q7, and who knows what else could get fried!  Use a screw that fixes ground braid to the cabinet or runs to the legs and lockbar. That's definitely a good ground point.  Test with power on that it is at ground.  Don't assume any black wire is a ground.
Here you see the 50v mini-driver PCB on the bottom left of the backbox,
above it the striker plate, the knocker assembly and then the fuse holder.
I won't be adding the TOPs board, or whatever was meant for that location.

The ground point is a screw at the bottom left of the metal plate for the I/O Driver PCB.
The Q24 transistor has the knocker "drive wire" attached to the metal tab with a small nut and bolt.
You can zoom in on the pictures (almost all in my blog are high resolution) for a better view. 

Oh and if you get done and a few things don't work (a couple flashers, some playfield lights) - don't start to panic, like I did.  Check the ribbon cable that connects the CPU board to the I/O Power Driver Board.  That's all it was.  Turned off the power, reseated that cable at both ends and all was well again.  Stern had even used "hot glue" to hold the ribbon cable in place for shipping, but I managed to knock it loose at the I/O Driver end.  Bliss! An easy fix.

17 Feb 2011

Haven't been blogging much. Went to the Soth Coast Slam Pinball Show.

South Coast Slam was an excellent show.   There must have been at least 3 (or maybe 4) LOTRs there.  I had  a look, but didn't play them.  No one (including me) took an LOTR LE to the show, they were all the original run versions.

Concentrated instead on the new Stern Avatar and Rolling Stones Pins.  Also had a play at CSI, which I still like in a strange way as I didn't think much of the TV series.

I took to the show:
A Williams Blackout (1980 - same year as Firepower), Blackout is very enjoyable for a single ball game.
A Williams Star Light (1984 - very rare System 7 game, only 100 were produced).  Has a two ball Multiball.
Both were used for the Slam's "Classic Tournament".
I had to spent a huge amount of time repairing and rebuilding the Blackout to have it ready for the show. I had bought it some time ago literally as a box of bits.  Someone had taken the whole top of the playfiled apart (like doing a shop job) and never finished putting it back together.  Luckily all the plastics were there (and the spinners).  I "borrowed" the rest of the missing posts and most of the other parts from my Alien Poker and Firepower spares. Except one metal piece which I had to make.

Looked to me like the previous operator (or owner) had plugged the Lamp Matrix ROW connector into the Ground and Logic +5v connector on the driverboard.  Which must have been an interesting lightshow for about 2 seconds.  It was the only un-keyed connector and I think they gave up on restoring the game after that.  So a driverboard repair and a playfield rebuild later and I have a fairly nice game.  Plays nice.

Got lots of comments from people that had never seen or played the Star Light or who remembered playing the Blackout "back in the day".  But back to posting about LOTR.

2 Jan 2011

Happy New Year 2011 to the LOTR PINBALL blog readers!

New things are coming in Pinball, with Jack at Pinballsales.com  announcing that he will manufacture pinball games, not just sell Stern games.  I have bought a game from him, and would do so again.  The first game announced is "Wizard of Oz".  Strange we went from some one in Oz that never built a game, let's say the blaggard of Oz to someone who will be making a game about the Wizard of Oz.  Pinball / Wizard.  It kind of fits together nicely, don't you think?  I can't wait to see some designers get going and for Jersey Jack's to produce some games.  This time it's different - this time it's going to happen for real.

On another note, back to LOTR, I made 149.39K and did DTR and TABA in the same game just now.  Great way to bring in the new year on the LOTR LE!  Now I know this wouldn't be fantastic high score for a pinball pro, someone that wins at tourneys but I did it today and it's the HS on my pin!


Have an enjoyable and successful 2011.

18 Dec 2010

Lit Flipper Buttons

Decided to light the flipper buttons on my LOTR LE.  Wanted to use red buttons, but didn't have Red Transparent buttons on hand.  Only Dark Blue, Green and an orange-amber color.  In the end, I found some clear buttons and lit them with high intensity Red LEDs.  It was that or use color changing LEDs, but I have a few of those on the game already (Palantir and Start Mode).

BTW the Pinball Center Noflix Plus Color changing LEDs are fantastic.  I used the Superflux #555 base on my Mode Start and liked it better then any other brand I have tried.  The colors are more distinct and no strobing effect, so well worth any extra cost.  Same for Noflix Plus Warm White.

This is what the transparent buttons  look lit by Red LEDs:


Here are some other color choices:


I used a nice circuit board, you can also do it with #555 bulb holders but this provides two LEDs on one power input terminal and simplifies the wiring.  Top are fully built and bottom are the bare PCBs.


An example of it fitted under a leaf switch:


I found an unused connector (3-pin molex) on the right hand side with the two outside pins at +12v and Gnd,   which was perfect.  You would need a Molex connector, pins should be .093".
Part Number Description          Molex Ref. No.
5791-09111-00   3-Pin Male     03-09-2032

Here's what it looks like installed inside my game:


You do get some "bleed through" where you see some LED light from under the playfield, but that's why red is a good choice.  Stern uses visible red LEDs all over the game for trough and VUK optos.

26 Nov 2010

Some More LOTR Bling

FLIPPER FIDELITY  www.flipperfidelity.com
(Some of these may be special Thanksgiving Black Friday prices):
LOTR Animated Backbox Lightboard $130 + shipping
It's an insert like the old skool white backboards behind most SS games, that replaces the Florescent light with LED Strips.  See: Install Instructions for what it looks like.  
Stern Speaker Upgrade Kit $110 +shipping  (also a "Woofer only" kit for $70)
flipper fidelity speaker kit 


COINTAKER www.cointaker.com
LOTR Custom LED Backbox $150 +shipping
You can get the idea of the effects by watching their Ironman Custom Backbox example. 
Stern Shaker Motor Kit $170 +shipping
Cointaker Stern Shaker Motor Kit (looks the same as the Pinball Life one I bought)


Disclaimer:  Except for the Shaker Motor kit  which will work with modern Stern games, I have not installed these mods.  But they look very cool. You could probably buy some Color Change LED Strips and a controller from your favorite site and make your own Custom backbox lighting.  Cointaker has the products you need listed on the above link.  But it could cost as much as buying a kit.

13 Nov 2010

Ring Magnet Fuse Blows Again

Ring Magnet Fuse Blows Again
The 5A SB Fuse at F7 (ring magnet) blew during a long 2-ball DTR and the ball just dropped out after it started oscillating " in the ring.  Which ruined the DTR mode of course.  It's been a long time since a fuse blew, so just replaced it.  Set back to 1-ball DTR.

LOTR Fellowship Inserts
Very  mixed emotions about using LEDs under inserts.  Planning to try a different color for each character in the fellowship, but decided on a more balanced effect.  It's impossible to get a picture of the LED colors, especially blues and greens, but these really do pop in person.
The order is:  Violet, Blue, Green, Warm White, Yellow (Frodo), WW, Gr, Bl, Vio.
Click to view full screen

For the Movie Multiball inserts I used Bright White, Yellow (matches Frodo in the Center) and Blue.  The bright white matches the LEDs in the "Rings of Elves" below it.  Not sure if I will keep these, as they flash strangely during DTR.

Update: I have taken out the 9 fellowship LEDs and put back in #555 bulbs.  This was because of the way the inserts strobe when the Fellowship Multiball has qualified and also at DTR.  I may be very sensitive to this, but for me it is too distracting.

I have only kept Bright White LEDs for all the square MB inserts and the LEDs I had already installed.  Only controlled LEDs are:  Color changing LEDs in the Start Mode and Palantir and some Flashers.

7 Nov 2010

Leg Protector Template

I got a request for this, it's not just useful for LOTR, but this PDF should work for most games.  If you have a new game, you should definitely  make a set!

I couldn't get 3-up to fit on an A4 sheet with a 1/2" margin area that printers usually fail to print.  So I did 2-up on 8 x 11".  You do not want to scale this when you print it out, so uncheck any "fit to page" type print settings. On my print settings that's 'Page Scaling' set to None, and deselect the 'Auto-Rotate and Center' option.

Use thick felt or a foam (like a yoga mat) to make protectors:  Leg Protector Template
Cut to the smaller leg bolt holes if you can, they are shown stretched for all situations and materials.
If you have comments or think there should be changes to the template, let me know.  Please, no comments about how to get the felt unjammed from your printer!

6 Nov 2010

Orthanc Diverter Gate stuck open again.

Diverter gate in front of Orthanc tower stuck open, needs adjusting for the third (and hopefully last) time.  I don't like the flipper mech they used here.   Arrrggggh!  Game has only 1,126 plays since new, and a few of those were 'test games' and not completed.


Took the gate out of the pawl (5/32" Allen Key) to inspect the linkage, plastic flipper bushing and linkage to the plunger.  Everything looks as new.  


Gate needed more vertical "play" this time, as you would with a flipper. Gate seemed to be very tight to the nylon flipper bushing that goes through the playfield.  Grey link was too tight in the pawl.  Although it could move, it seemed much tighter than last time mech was adjusted.  Starting to  wonder if the pawl can tighten itself even more to the link , if set too close?  Won't let that happen again.


Fix: I set the pawl to link not more than 'finger tight' this time, with ample play between the link and pawl  (1/16" to 1/8") and between the gate and flipper bushing (1/8" or slightly less).  Re-adjusted the diverter gate as per inside cover of manual (Stern SB147).  Back to normal, plays fine.

1 Nov 2010

LOTR LE Yellow Manual Pages

If you are following this blog, or happen across it and own an LOTR LE then I have a treat for you:

You can print out the LE I/O Power Driver Board Schematics in 17"x11" which I posted previously, if you have access to a large format printer.

If you want the standard manual page sizes, here are the schematics edited to replace Pgs 99-150, the whole Yellow section of the LE Manual, which was a mess as supplied.

The I/O board theory had to be edited to match the schematics and although it may not be perfect,  it took a lot of work to finish the Yellow section.  You get colour diagrams and a corrected I/O Power Board connector layout on page 127.

29 Oct 2010

Shop-out Matrix for LOTR LE Cabinet and documentation

Well you probably know if you follow this Blog or own the LOTR LE , that the manual Stern included with the LE wasn't very good.  My pet hate about the LE has nothing at all to do with the game!
Begin mode:=/Documentation Rant/
Stern just couldn't be bothered to do a decent job on the documentation, and don't seem to be focused on the pinball collector.  It's clear to me that pinball coin op alone won't keep them in business for much longer.
Recently discovered that the 17" x 11" Page stapled in to the cabinet had mistakes,  as it was the one used on the  original LOTR.  This is what a pinball tech or you might refer to when fault finding.  On my LE at least, wire colors and 2 solenoids positions were changed.  The updated LE matrix I did shows a different Solenoid table and correct wiring colours for the Lamp Matrix.

LE Examples: I have shown coil #12 as the opt. shaker motor, #14 is unused on the LE, #28 is the Helms Deep Right flasher.  Print it in colour and laminate it:  LE Cabinet-Matrix 11" x 17"  Better than what came in the game from Stern.

The Matrix files for LOTR and LOTR LE are marked *new* here:  My LOTR Main Site
I plan to host a LOTR LE Manual which is fairly complete.  If you download these files:
  • "LOTR LE Manual 2009 Find it in Front"  (Goes Between Front Cover and Table of Contents) 
  • "LOTR LE Manual 2009 Complete to Pg102"   and the  
  • "LOTR LE I/O Driver Board Schematic"  (Sam 520-5249-00 in 17" x 11" format)
Then you are close to having an updated LOTR LE manual, for now some pages are edited B/W scans.
I'm still working on finishing Section 5 and the last of the schematic pages.  I need to include the correct version for the I/O Driver board that came installed in the LE, and update some descriptions.

The main board that changed in the LE compared to the original 2003/2005 LOTR was the I/O Power Driver Board which is a Stern 520-5249-00 (Sam).  I also don't like using a "Z" connector used between the playfield and the I/O Driver board to convert J10 to the new positions.  Why not just make the harness terminate correctly in the first place?

The CPU Sound II Board is a Stern 520-5300-00 Rev A (Whitestar).

End mode:=/Documentation Rant/
-Richard

Back Alley Creations LOTR Siderail Art

Here is a link from a Blog I follow.  Some amazing siderails, although like many others I don't like the choice of colour for the powdercoat on the lockbar, siderails and legs.  If you go to all that trouble you, why not take the time to remove the horrible plastic plug from the lockbar!?!  I don't agree with everything they do, but the gold script is fantastic.

My Precious!  Lol.  That's what my daughter says the iPad owners  are currently  saying.  She imagines someone in the corner of a  marketing department  drooling over their new iPrecious (TM).


6 Oct 2010

LOTR "One Ring" Shooter Mod


Decided to order the LOTR Custom Ring Shooter made by Tom Wible.  $64.99 + $5 ship.  He does some amazing stuff, and announced on RGP that he was doing 20 more LOTR shooters. Having the One Ring suspended in the shooter is one of the nicer looking mods available for LOTR, and especially on the gold themed LE.   Tom's website is:   Tom's Twilight Zone PB Machine Accessories

He also made a cool Rolling (pin)Ball Sculpture.  There's a link at the bottom of the page. Been thinking lately doing a similar thing, some kind of kinetic pinball sculpture.  There is a musical one that still works at Logan Airport in Boston, MA.  I think terminal C (or now in E), anyway it's in international arrivals.  I remember watching it when younger, it's called Exercise in Frugality by George Rhoads you can find his work all over the place in the USA.  You probably have one near you.

30 Sept 2010

LOTR LE Shaker Motor

I have heard recently that someone blew up their CPU (and maybe I/O Driver board too) trying to add a (non kit) Shaker Motor to their LOTR LE.  A replacement CPU part number 520-5300-00 will run you $350-400 (US dollars).  Maybe less to fix, but it may not be an economic repair.


BTW - Do not be frightened of buying the right kit (Stern rev B) and doing the install.  The LOTR LE was designed to allow you to add this feature.  Ask questions if you are unsure of something!  The Shaker Motor is a great addition , maybe the best $170 I've spent so far.


So although I covered a few things about my Shaker Motor install here, I'm going to revisit the main points.   A link to the Scan of Shaker Rev B. Install Instructions


You will have to take the measurements from the instructions and create a template.  I think printing the template example scaled to double size would be very close.  e.g.  the 2” distance measures almost exactly 1” at actual size in the PDF.


Some IMPORTANT points to note:


Wiring Harness
The BRN/GRY wire 72” it talks about on a male connector.  This connects to a BLU/YEL female connector  coming from the head that can be found at the back of the cabinet on an LOTR LE.  It has a single BLU/YEL wire in the same place as the BRN/GRY wire in the 72” harness. 
  
The RED/WHT connector is short and will exactly match another RED/WHT connector found in the wire harness on the LOTR LE around the plumb-bob tilt area..

Motor installation
Tape the bottom of the cabinet with masking tape where you expect the holes will exit, and use a sharp 7/32” wood bit.  Let the drill do the work, don’t push hard. Clean up the bottom of cabinet to your liking and tape the 4 “T-nuts” into place, but don’t hammer them in.  Then as you screw down the motor tighter from the top, make sure the T-nuts are sinking in to the cab bottom and not spinning.

If I could do it again, I would move the template for the shaker mounting holes about another .5” (half inch) away from the left edge of the cabinet and towards the coin box.  Only .812” was indicated on the template. Hole position away from front of cab at 4.375” is perfect.  Doing that would let you take the cover off the shaker motor (for adjustments or oil, in future) without having to remove the Shaker Motor PCB above.