18 Dec 2010

Lit Flipper Buttons

Decided to light the flipper buttons on my LOTR LE.  Wanted to use red buttons, but didn't have Red Transparent buttons on hand.  Only Dark Blue, Green and an orange-amber color.  In the end, I found some clear buttons and lit them with high intensity Red LEDs.  It was that or use color changing LEDs, but I have a few of those on the game already (Palantir and Start Mode).

BTW the Pinball Center Noflix Plus Color changing LEDs are fantastic.  I used the Superflux #555 base on my Mode Start and liked it better then any other brand I have tried.  The colors are more distinct and no strobing effect, so well worth any extra cost.  Same for Noflix Plus Warm White.

This is what the transparent buttons  look lit by Red LEDs:


Here are some other color choices:


I used a nice circuit board, you can also do it with #555 bulb holders but this provides two LEDs on one power input terminal and simplifies the wiring.  Top are fully built and bottom are the bare PCBs.


An example of it fitted under a leaf switch:


I found an unused connector (3-pin molex) on the right hand side with the two outside pins at +12v and Gnd,   which was perfect.  You would need a Molex connector, pins should be .093".
Part Number Description          Molex Ref. No.
5791-09111-00   3-Pin Male     03-09-2032

Here's what it looks like installed inside my game:


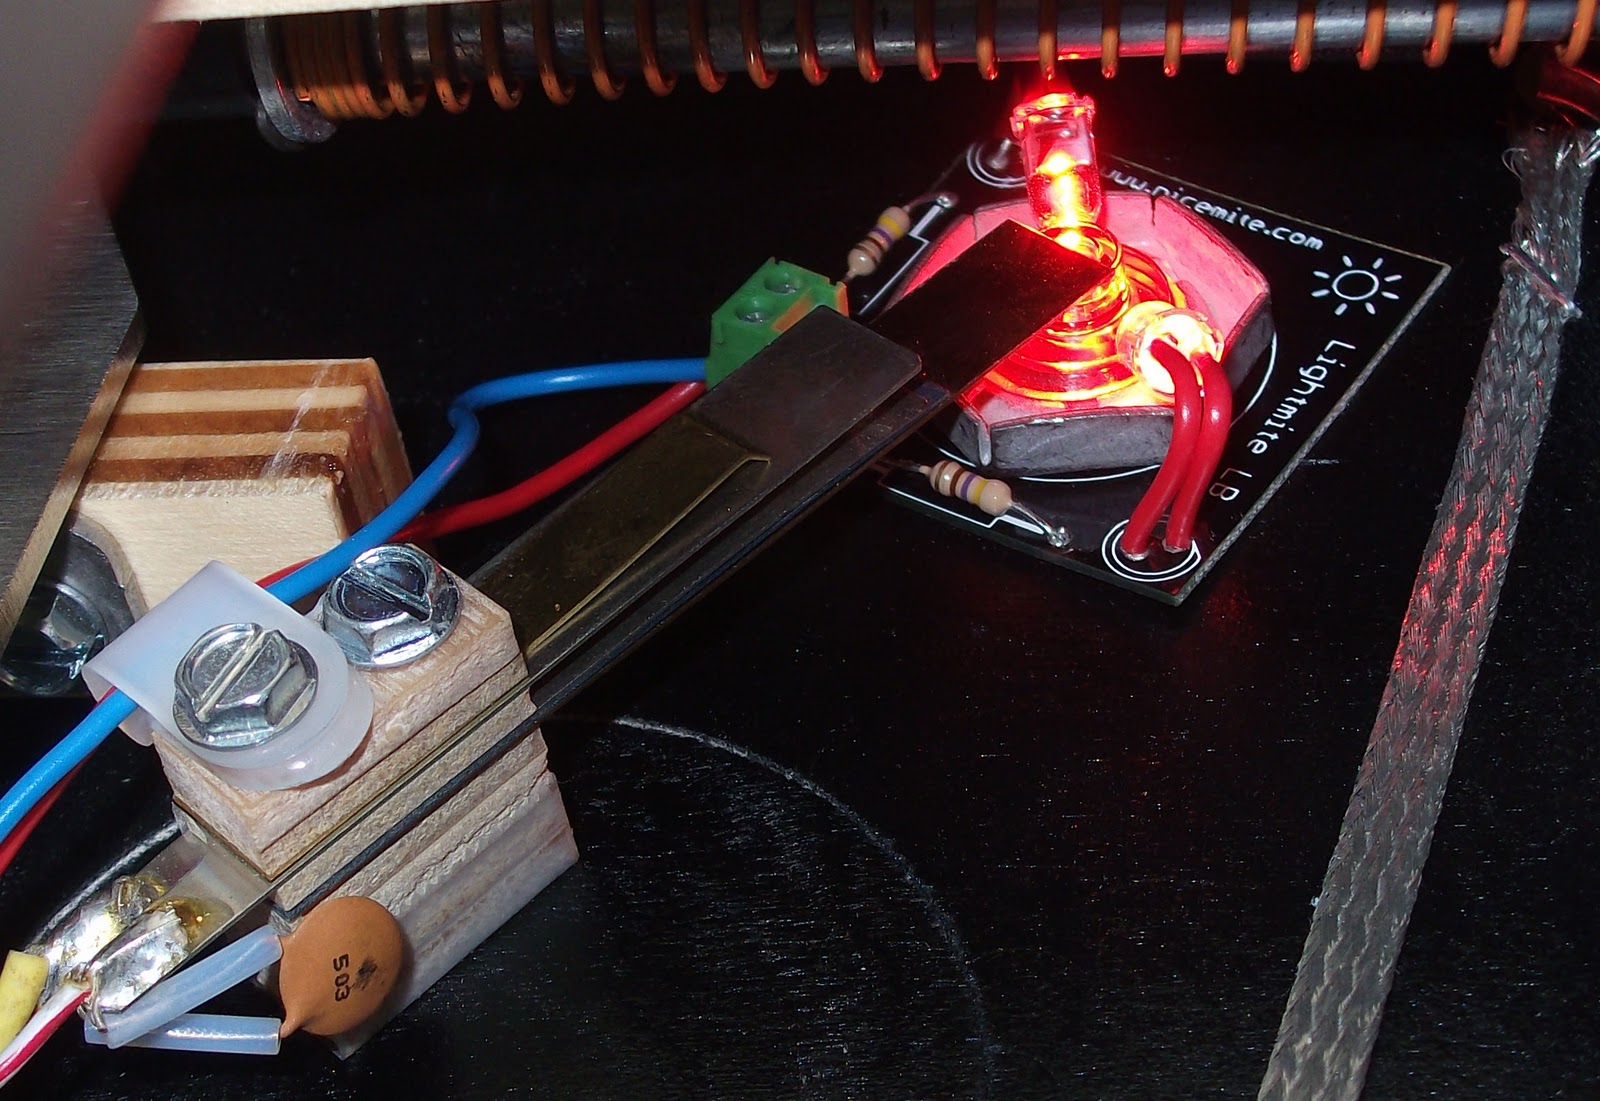
You do get some "bleed through" where you see some LED light from under the playfield, but that's why red is a good choice.  Stern uses visible red LEDs all over the game for trough and VUK optos.

26 Nov 2010

Some More LOTR Bling

FLIPPER FIDELITY  www.flipperfidelity.com
(Some of these may be special Thanksgiving Black Friday prices):
LOTR Animated Backbox Lightboard $130 + shipping
It's an insert like the old skool white backboards behind most SS games, that replaces the Florescent light with LED Strips.  See: Install Instructions for what it looks like.  
Stern Speaker Upgrade Kit $110 +shipping  (also a "Woofer only" kit for $70)
flipper fidelity speaker kit 


COINTAKER www.cointaker.com
LOTR Custom LED Backbox $150 +shipping
You can get the idea of the effects by watching their Ironman Custom Backbox example. 
Stern Shaker Motor Kit $170 +shipping
Cointaker Stern Shaker Motor Kit (looks the same as the Pinball Life one I bought)


Disclaimer:  Except for the Shaker Motor kit  which will work with modern Stern games, I have not installed these mods.  But they look very cool. You could probably buy some Color Change LED Strips and a controller from your favorite site and make your own Custom backbox lighting.  Cointaker has the products you need listed on the above link.  But it could cost as much as buying a kit.

13 Nov 2010

Ring Magnet Fuse Blows Again

Ring Magnet Fuse Blows Again
The 5A SB Fuse at F7 (ring magnet) blew during a long 2-ball DTR and the ball just dropped out after it started oscillating " in the ring.  Which ruined the DTR mode of course.  It's been a long time since a fuse blew, so just replaced it.  Set back to 1-ball DTR.

LOTR Fellowship Inserts
Very  mixed emotions about using LEDs under inserts.  Planning to try a different color for each character in the fellowship, but decided on a more balanced effect.  It's impossible to get a picture of the LED colors, especially blues and greens, but these really do pop in person.
The order is:  Violet, Blue, Green, Warm White, Yellow (Frodo), WW, Gr, Bl, Vio.
Click to view full screen

For the Movie Multiball inserts I used Bright White, Yellow (matches Frodo in the Center) and Blue.  The bright white matches the LEDs in the "Rings of Elves" below it.  Not sure if I will keep these, as they flash strangely during DTR.

Update: I have taken out the 9 fellowship LEDs and put back in #555 bulbs.  This was because of the way the inserts strobe when the Fellowship Multiball has qualified and also at DTR.  I may be very sensitive to this, but for me it is too distracting.

I have only kept Bright White LEDs for all the square MB inserts and the LEDs I had already installed.  Only controlled LEDs are:  Color changing LEDs in the Start Mode and Palantir and some Flashers.

7 Nov 2010

Leg Protector Template

I got a request for this, it's not just useful for LOTR, but this PDF should work for most games.  If you have a new game, you should definitely  make a set!

I couldn't get 3-up to fit on an A4 sheet with a 1/2" margin area that printers usually fail to print.  So I did 2-up on 8 x 11".  You do not want to scale this when you print it out, so uncheck any "fit to page" type print settings. On my print settings that's 'Page Scaling' set to None, and deselect the 'Auto-Rotate and Center' option.

Use thick felt or a foam (like a yoga mat) to make protectors:  Leg Protector Template
Cut to the smaller leg bolt holes if you can, they are shown stretched for all situations and materials.
If you have comments or think there should be changes to the template, let me know.  Please, no comments about how to get the felt unjammed from your printer!

6 Nov 2010

Orthanc Diverter Gate stuck open again.

Diverter gate in front of Orthanc tower stuck open, needs adjusting for the third (and hopefully last) time.  I don't like the flipper mech they used here.   Arrrggggh!  Game has only 1,126 plays since new, and a few of those were 'test games' and not completed.


Took the gate out of the pawl (5/32" Allen Key) to inspect the linkage, plastic flipper bushing and linkage to the plunger.  Everything looks as new.  


Gate needed more vertical "play" this time, as you would with a flipper. Gate seemed to be very tight to the nylon flipper bushing that goes through the playfield.  Grey link was too tight in the pawl.  Although it could move, it seemed much tighter than last time mech was adjusted.  Starting to  wonder if the pawl can tighten itself even more to the link , if set too close?  Won't let that happen again.


Fix: I set the pawl to link not more than 'finger tight' this time, with ample play between the link and pawl  (1/16" to 1/8") and between the gate and flipper bushing (1/8" or slightly less).  Re-adjusted the diverter gate as per inside cover of manual (Stern SB147).  Back to normal, plays fine.

1 Nov 2010

LOTR LE Yellow Manual Pages

If you are following this blog, or happen across it and own an LOTR LE then I have a treat for you:

You can print out the LE I/O Power Driver Board Schematics in 17"x11" which I posted previously, if you have access to a large format printer.

If you want the standard manual page sizes, here are the schematics edited to replace Pgs 99-150, the whole Yellow section of the LE Manual, which was a mess as supplied.

The I/O board theory had to be edited to match the schematics and although it may not be perfect,  it took a lot of work to finish the Yellow section.  You get colour diagrams and a corrected I/O Power Board connector layout on page 127.

29 Oct 2010

Shop-out Matrix for LOTR LE Cabinet and documentation

Well you probably know if you follow this Blog or own the LOTR LE , that the manual Stern included with the LE wasn't very good.  My pet hate about the LE has nothing at all to do with the game!
Begin mode:=/Documentation Rant/
Stern just couldn't be bothered to do a decent job on the documentation, and don't seem to be focused on the pinball collector.  It's clear to me that pinball coin op alone won't keep them in business for much longer.
Recently discovered that the 17" x 11" Page stapled in to the cabinet had mistakes,  as it was the one used on the  original LOTR.  This is what a pinball tech or you might refer to when fault finding.  On my LE at least, wire colors and 2 solenoids positions were changed.  The updated LE matrix I did shows a different Solenoid table and correct wiring colours for the Lamp Matrix.

LE Examples: I have shown coil #12 as the opt. shaker motor, #14 is unused on the LE, #28 is the Helms Deep Right flasher.  Print it in colour and laminate it:  LE Cabinet-Matrix 11" x 17"  Better than what came in the game from Stern.

The Matrix files for LOTR and LOTR LE are marked *new* here:  My LOTR Main Site
I plan to host a LOTR LE Manual which is fairly complete.  If you download these files:
  • "LOTR LE Manual 2009 Find it in Front"  (Goes Between Front Cover and Table of Contents) 
  • "LOTR LE Manual 2009 Complete to Pg102"   and the  
  • "LOTR LE I/O Driver Board Schematic"  (Sam 520-5249-00 in 17" x 11" format)
Then you are close to having an updated LOTR LE manual, for now some pages are edited B/W scans.
I'm still working on finishing Section 5 and the last of the schematic pages.  I need to include the correct version for the I/O Driver board that came installed in the LE, and update some descriptions.

The main board that changed in the LE compared to the original 2003/2005 LOTR was the I/O Power Driver Board which is a Stern 520-5249-00 (Sam).  I also don't like using a "Z" connector used between the playfield and the I/O Driver board to convert J10 to the new positions.  Why not just make the harness terminate correctly in the first place?

The CPU Sound II Board is a Stern 520-5300-00 Rev A (Whitestar).

End mode:=/Documentation Rant/
-Richard

Back Alley Creations LOTR Siderail Art

Here is a link from a Blog I follow.  Some amazing siderails, although like many others I don't like the choice of colour for the powdercoat on the lockbar, siderails and legs.  If you go to all that trouble you, why not take the time to remove the horrible plastic plug from the lockbar!?!  I don't agree with everything they do, but the gold script is fantastic.

My Precious!  Lol.  That's what my daughter says the iPad owners  are currently  saying.  She imagines someone in the corner of a  marketing department  drooling over their new iPrecious (TM).


6 Oct 2010

LOTR "One Ring" Shooter Mod


Decided to order the LOTR Custom Ring Shooter made by Tom Wible.  $64.99 + $5 ship.  He does some amazing stuff, and announced on RGP that he was doing 20 more LOTR shooters. Having the One Ring suspended in the shooter is one of the nicer looking mods available for LOTR, and especially on the gold themed LE.   Tom's website is:   Tom's Twilight Zone PB Machine Accessories

He also made a cool Rolling (pin)Ball Sculpture.  There's a link at the bottom of the page. Been thinking lately doing a similar thing, some kind of kinetic pinball sculpture.  There is a musical one that still works at Logan Airport in Boston, MA.  I think terminal C (or now in E), anyway it's in international arrivals.  I remember watching it when younger, it's called Exercise in Frugality by George Rhoads you can find his work all over the place in the USA.  You probably have one near you.

30 Sept 2010

LOTR LE Shaker Motor

I have heard recently that someone blew up their CPU (and maybe I/O Driver board too) trying to add a (non kit) Shaker Motor to their LOTR LE.  A replacement CPU part number 520-5300-00 will run you $350-400 (US dollars).  Maybe less to fix, but it may not be an economic repair.


BTW - Do not be frightened of buying the right kit (Stern rev B) and doing the install.  The LOTR LE was designed to allow you to add this feature.  Ask questions if you are unsure of something!  The Shaker Motor is a great addition , maybe the best $170 I've spent so far.


So although I covered a few things about my Shaker Motor install here, I'm going to revisit the main points.   A link to the Scan of Shaker Rev B. Install Instructions


You will have to take the measurements from the instructions and create a template.  I think printing the template example scaled to double size would be very close.  e.g.  the 2” distance measures almost exactly 1” at actual size in the PDF.


Some IMPORTANT points to note:


Wiring Harness
The BRN/GRY wire 72” it talks about on a male connector.  This connects to a BLU/YEL female connector  coming from the head that can be found at the back of the cabinet on an LOTR LE.  It has a single BLU/YEL wire in the same place as the BRN/GRY wire in the 72” harness. 
  
The RED/WHT connector is short and will exactly match another RED/WHT connector found in the wire harness on the LOTR LE around the plumb-bob tilt area..

Motor installation
Tape the bottom of the cabinet with masking tape where you expect the holes will exit, and use a sharp 7/32” wood bit.  Let the drill do the work, don’t push hard. Clean up the bottom of cabinet to your liking and tape the 4 “T-nuts” into place, but don’t hammer them in.  Then as you screw down the motor tighter from the top, make sure the T-nuts are sinking in to the cab bottom and not spinning.

If I could do it again, I would move the template for the shaker mounting holes about another .5” (half inch) away from the left edge of the cabinet and towards the coin box.  Only .812” was indicated on the template. Hole position away from front of cab at 4.375” is perfect.  Doing that would let you take the cover off the shaker motor (for adjustments or oil, in future) without having to remove the Shaker Motor PCB above.

26 Aug 2010

Destroyed the Ring in 20.66

Oh Yeah.


Great time on Destroy The Ring today, previous best was just over 30 secs.

Today I hit all four lane / ramp shots and made DTR in 20.66 secs, probably can't do it faster than that.  Haven't had a high score or new DTR time in ages, so it felt good.

18 Aug 2010

Funny and accurate LOTR review. Great read.

Spotted this link pinballreviews.com LOTR link.
"Worm" has a great review and you can tell he has played the game lots and knows it well.

17 Aug 2010

Shire VUK Problems

Left VUK went flaky again.  That switch was last changed for a new one at the end of March, so it lasted less than 6 months!  Take into account that I have been away in the USA on business in May for 3 weeks and then on holiday all of July.  The switch gets hammered in gameplay, but should last longer than a few months.  The old style Williams VUK design (or the use of optos on upkickers) seems to work for years.

Discovered during testing with a ball resting in the fork of the switch, that a slight pressure at the back of the switch blade would trigger a closure.  So I took two needle nose pliers and put a slight bend upwards on the blade about 1/4 of the way along the switch body.  This fixed the problem, for now.  Doubtful that it will stay fixed once it goes out of adjustment.  Bummer.

16 Aug 2010

AOME Figures for Sale

Published a new tab showing new original LOTR AOME figures for sale in the UK.
Willing to post elsewhere for actual postage costs.

14 Aug 2010

Ring Made switch #47 getting stuck closed

Had a connection problem (don't really want to call it an opto problem) where game was seeing "ring made" switch #47 close during a game, even though no ball was in the ring.  Symptom in a game was having mode start without shooting the spinner/ring shot also the magnet could not grab the ball correctly.


Normally the opto transmitter shines bright red LED light into the opto receiver.  Through some transistors on the opto amplifier board (and logic gates) the CPU "sees" this as an open switch.  If the transmitter LED fails (or the light is blocked by the ball), the receiver changes voltage and the switch is detected as closed.

The opto went on / off during a switch test when the ring was banged or the glass slid back in place sharply.  Looking at the opto amplifier board mounted to the right of the backboard there was a 2-pin connector that had been bent right over, probably the transmitter opto to the ring.  Turned off game, bent the pins up straight and plugged back in connector.  Switch test showed the "ring made" working only when it should again (stick finger in the ring).

At least that fault was fairly easy to diagnose and fix.

Gandalf the White

Tired of the "surfing Gandalf the Grey", which just doesn't look right, I decided to open up my AOME Gandalf the White which has sat on a shelf for some time.  I waited to be able to defeat the Balrog by winning FOTR MB, latest time was yesterday before Gandalf could return in White on Shadowfax.

Looking it over and checking with a test fit, it looks like fixing the base to the Pinbits plastic with epoxy will be the best solution.  So out comes the Gorrila Glue expoxy, and a few minutes later it is mounted in the game.  Will let it dry for 24 hours before playing, meanwhile here's a pic:


Here is the link of my Gandalf on Shadowfax in case you want to save it or see higher resolution.

Getting to the point where the "mods" to this game are done, and I just want to "play LOTR pinball".

Lane Secret Skill Shot

Lane Secret S.S. is counted by Audit #26, and on my game the Lane secret skill shot has been made 35 times!  It could be awarded for hitting the Lane Skill Shot without flipping, which would make sense.  Need to test that out.  Update:  Tested and confirmed.

Have also heard of a Flipper Secret Skill Shot, but couldn't find it in the audits.
Tried looping the Flipper Skill Shot a few times, but that doesn't seem to award any extra points.
Someone (Korn on RGP) suggests you can hold up the left flipper while plunging, feed the ball to the right flipper and hit the right lane Flipper Skill Shot from there.  I call that a "chip shot", or a slice.

Chip shot isn't a good use of the golf term, but pinball isn't golf.  Slice is more a more correct decscription  also borrowed from the golf term for a ball that moves right.  A Hook (or Fade) goes left.

I need to test out the Flipper Secret S. S. to see if it scores more points or gives a different graphic.

13 Aug 2010

POTD Lane Diverter (by Pinwest) Added

OK. On my POTD the ball almost always goes down lane 2.  I figured out you can nudge fairly hard to sometimes get to lane 1, but I have another solution I'm ready to try.

Pinwest (David Eisner, CA) made a plastic diverter and this was sold for a while by BAA.  See: LOTR parts tab.  This has nothing to do with the ball falling off the end of the POTD.   This mod is designed to help "even out" the selection of lanes 1 and 2.

The parts used:
Defector and longer screw are for the top of the POTD
Clear post goes at the bottom of the POTD to replace a metal post  previously installed, which bumps the ball into the wireform some of the time.  This means the "Shire Hole" VUK switch and wood get hammered less.  See: LOTR Blog from 13th April 2010


POTD Lane Deflector Installed 

You can see the ball will hit at an angle, and doesn't actually touch the 3 posts.  Once it is adjusted tot he right angle, the selection of lanes 1 and 2 are more even.

Here is a link to the installation instructions which contains some extra pictures.  This could be useful if you decide to try and make one yourself:
POTD Lane Defector Installation Instructions


12 Aug 2010

LOTR Eye Flasher Kit Added

Played no pinball for a month in the USA, had planned a visit to an arcade but didn't get there in the end.  The only game even seen (at a small Pizza place) was Indiana Jones (the newish Stern).  That game didn't get my money.  Last time there, perhaps a year ago, they had a POTC which I played.

Didn't want to reinvent the wheel this time, so bought the Pinbits "Lord of the Rings Backbox Flasher Kit"  With LED Color : Yellow for $22.50 while in the USA.  Installed it which was very easy and it's a fun mod.  Added my own "reflector" and lens from a flashlight to increase and concentrate the flash effect.  It's mounted to the base of the LED with a rubber ring.  The Eye Flasher and my backbox warming filter is in the picture.  Right click and save the image to your computer if you want to zoom up to a higher resolution.


There is also a DIY flasher mod I found at: Habos Arcade LOTR

The  real source is at Bob's Pinball Mods.  Bob Frysztak has published some nice LOTR Mods including the  LOTR DIY Flasher  This one suggests to connect the flasher to J6 pin 3 which is Coil #27, the Back Panel flasher (Eye) hiding behind the Barad-Dur tower.  This makes sense to me.

Be aware that following the instructions which comes with the Flasher Kit will connect the flasher to J6 pin 2 which is Coil #26 the Ring flasher!  This means the Backbox Eye and the Ring both flash each time you hit the spinner.  I put an amber flash lamp behind the ring which looks cool, and coil is probably used more often during the game.

30 Jun 2010

Haven't had much to say recently, going on holiday for a month

Taking a break for my vacation in the USA.
Not near my LOTR LE from start of July, back in early August.
Headed for Boston area and then to Cape Cod, MA.

25 Jun 2010

Diverter Gate in front of Orthanc wouldn't return to rest position.

This happened before on the 12th March.  Same problem. Playing a game and the diverter in front of the Orthanc tower stuck and wouldn't return.
  • Looked under the playfield at flipper mech for diverter gate. Spring wasn't  able to return the gate to "home" (closed). 
  • Binding somewhere at the coil or plunger.  Had the coil moved in the stop? Was the plastic flipper bushing that goes through playfield broken or worn? There didn't seem to be too much "slop" when I wiggled the gate around.
  • Rotated the screw for the link connection and the gate could then snap closed.  So it looks like the link to the plunger was binding, 
  • Does the metal link bushing needs to be replaced? Maybe, but I reason unlikely given how many times the gate is used compared to flipper flips, so more likely that it was over tightened.  Got a hex key set and loosened the bolt slightly to help avoid binding in future.  
  •  Followed instructions to adjust the "Diverter Gate" properly (again), this is found on the inside front cover of the LOTR manual.  Also shown in Service Bulletin #147.  
  • Diverter working correctly.  
My personal view:  Don't like the mech Stern has used much.  The main advantage is that it uses standard parts, but the spring seems weak for the task and it seems to go wrong for me occasionally.  The ramp diverter on TZ is a more elegant design.  Stern chose to use cheap existing parts vs. WMS/Bally who could do custom designs back when pinball was making money.

8 Jun 2010

After coming back from the USA, I seem to have lost my LOTR touch.

Just can't make the shots as well as when I was playing almost daily.  Have watched the "Pinball 101" DVD a couple of times, which was bought in the USA.  It's great information, but hasn't improved my style of play on LOTR.


A bit OT, but I have played my AFM more lately and got to "rule the universe" early this month.  I think on the 5th.  Since then, it's been needing some love:
  1. Rebuilt the 3 pop bumpers.  Hate to do that on any game.  Dropped down the whole bracket assembly underneath and replaced the coil sleeves and cleaned them up.  Someday I'll need to take the ramps off and do the pop bumper skirts on top. Way too much trouble, but it needs to be done.  Eventually.
  2. Left Slingshot power wire fell off the coil.  An easy fix.
  3. Right popper (the SOL hole VUK) was firing for no reason, even at attract mode.  Put it in on switch test and had a look. Shined a flashlight at the optos and it registered.  So the receiver was good.  Re soldered the wires to the transmitter and it was back to normal.
  4. It has the Bill Ung Mini-Saucer LED kit fitted.  Two LEDs on a mini ship were out.  Replaced the LEDs.  I had used dots of superglue to hold them in and had to carefully break the old ones out.
Here's a link to how I have wired up my mini saucers: AFM Mini Saucers

One nice thing about the LOTR LE, or perhaps any newer Stern:
Now that it has gone through all the teething troubles, there aren't many maintenance tasks like the above lately.  Is this a direct result of how much it gets played?  Don't think so, it just seems to have become quite stable lately.  No one in my house has complained about problems and it plays well.  It's just a shame the same can't be said about me. 


Favorite mode since adding the shaker motor:  
Gandalf vs. Saurman
Already liked this mode, but love the way it starts with the doors slamming shut.  And the way it ends when you make all the shots.  Second favorite:  War of the Ents.  


Easiest modes (for me) to complete are:  
Escape the Ringwraiths and Attack of Shelob

23 May 2010

Gold Trim on LOTR LE

Avoided this subject so far until I had more understanding of the problem.  Have heard recently of others reporting the same problems so more willing to give my opinion.  In one sentence: the "brass finish" on the lockbar and siderails tarnishes very easily.  I tried taking a picture, but because of the reflections it's incredibly difficult to document in a photo.  Found brown tarnish spots near where your thumbs rest on the the siderails and also some bad brown discoloration marks and places with 'black specks' on the lockbar.  This is within 3-4 months from NIB.  Got in touch with Stern and they offered to swap out the lockbar for another new one under guarantee.  I would have to return the original, which is fine.

So when I got the replacement, I figured I would clean it up and try to seal it.  No wax or other finish on it, and I tried Krylon "triple thick".  Did a dry coat and then one wet coat.  Big mistake,  it looked like a hammered finish and only went clear in a few areas.   I had to 'T-cut' it back off, no not with 'T-cut' !!!  I used a brass polish called 'brasso' that I like and it acted like a solvent and a slightly abrasive compound.  After a few minutes carefully cutting only the Krylon off, it was back to shiny and bright.  But I'm not sure of the long term effect of this step, seems OK and I plan to wipe it down after game use.

I learned my lesson.  It needs a lacquer of some sort and not a polyurethane.  Auto clear might be perfect, but I don't have the ability to shoot a 2-part clear at  home.  Perhaps next I will get in touch with the local metal plating and chroming shop and ask advice.

Personally, I won't be buying a 'gold effect version' game again.  Unless it really is gold plated. Brass seems to scratch and tarnish much too easily. I like chrome, which is more durable.  They actually have to nickel plate the metal and then add a chrome plate layer on top, if I'm not mistaken.

20 May 2010

Back after a visit to the USA for nearly a month.
Went to see the Ironman2 film at the Imax the weekend it came out, and my brother took delivery of a Stern Ironman at his house near Chicago.  Had played it during the Rocky Mountain Pinball Showdown RMPS tournament in Golden Colorado. I'm not in the same league as the serious tourney players there.

IM is a fun game, but more random than LOTR due to the two playfield magnets and a "war machine" kickback.  It could easily kick my arse, nearly every time!  I only once got to the final "do or die" mode, after making all the other modes, and then drained trying to make the shot as it counted down from 50Mil (I think).  I think I like slower paced games, although the theme is great.  Great sounds and light show, should earn well on location.

Back to LOTR LE, I fitted the Shaker Motor today kit (502-5027-00 rev B.) and it was fairly easy to do.  More on the shaker later once I get my shots back and can get further into the game.

A couple of points if you fit a Shaker to a LOTR LE:
  1. The tiny PCB (printed circuit board) needs to go somewhere else than where the instructions show, or you need to mount the shaker motor further away from the side of the machine towards the coin box.  Otherwise you can't get the cover off the shaker motor without taking out the PCB.  No big deal.
  2. The #8-32 screws that hold the cover on didn't fit.  I think they weren't tapped out correctly  on the motor.  I just changed to some self tapping machine screws.
  3. The BRN-GRY wire didn't exist on my LOTR LE harness.  The only wire in the back of the cabinet that looked correct was BLU-YEL.  It did have a center connector on the same size molex plug, so I went for it and it worked.

The shaker "blips" when you make certain shots, like adding the FOTR characters and making the right shots during modes.  The choreography of the game play and the Shaker Motor is outstanding, like when the doors shut at the beginning of the "Gandalf vs. Saruman" mode.  This is a great add-on for the price.  About $170 at Pinball Life, if they have them in stock.  Costs more from a Stern distributor, e.g. pinballsales.com quotes a RRP of $290 for the same shaker motor kit but have decent  prices on NIB Stern games.


Flasher changes:
Bought some 4+1HP flashers at RMPS from Cointaker.com.  Amber Flasher LED in the two "helms deep" flashers.  Trying an Amber one in the backboard ring flasher, and I may put one under the sword lock when I can get to it.  Yellow/Amber #906 bulb for now.  There's also an Orange LED flasher behind the Eye at the top of Barad-Dur.  About the only original #906 flasher left will be under the playfield at the "DTR" insert. 
I also bought a slower color-changing #44 LED for the Palantir, but it doesn't work on the game.

21 Apr 2010

Away for a while in the USA

I'm leaving tomorrow, if I can fly out from London (UK) to Denver, CO.  They closed UK airspace for about 6 days, and it's just getting back to normal.  Perfect timing for me, I hope.

Itinerary:  Golden, CO.  Santa Fe, NM.  And then on to Chicago, the windy city.

Heading to the RMPS in Golden, CO.  A really fun pinball show and not too big, still has a family atmosphere.  Unlike Expo '09 in Wheeling, IL near Chicago.  You also get an added benefit of the crisp clean air of the Rocky Mountains, with a Coors brewery tour not far away.


Colorado, where the air is cold and thin, and the beer is colder and thinner.

Will rent a car and drive to New Mexico, where I was born.  I have some business to sort out while there.

Next I'm flying to Chicago, the home of pinball.   My older brother lives there and perhaps I will get to see something new coming from Stern.  It certainly should be a chance to pick up some parts locally.  May find time to blog from there on this site about what I find out.


I won't be modifying my LOTR LE game (or playing it) so not many posts about that until I'm back.

18 Apr 2010

Defeated the Balrog today

That's it, won the FoTR MB.  I can do all the elements of a good game: DTR, win FoTR or other MBs, get to TaBA.  But "putting it all together" in one game is still a challenge for me.  See abbreviations list if you can't understand my geeky jargon.

Really happy with the wood rail protector/ PoTD post combination mentioned recently. Doesn't change gameplay, but helps with the flow.

13 Apr 2010

PoTD Post Diverter


Gave this PoTD Post Diverter Target a try, took me half a minute to fit.

Saw a solution posted on RGP of tapping out a $0.75 clear post and then using an #6-32 threaded rod.  Just wanted to see how it played, so did this mod instead with parts on hand. Removed one screw and intalled a new # 6-32 MS metal post with a black post bead on it. Done. Will try some games with the post there for a while, and then decide if it's a good solution.

Ingredients: Metal 6-32 MS threaded post, black post bead 7/16" OD. You need to use a # 6-32 MS threaded post to replace the screw at the end of the PoTD. That's what I did here.

To get a perfect look, use a threaded rod (cut down a 6-32 screw) and a mini-jewel clear plastic post ($0.75 from "Pinball Life" see parts links page). Stern ref is #550-5052-01.
So far, I like that it doesn't divert every ball to the wireform.

11 Apr 2010

TTT MB (The Two Towers MultiBall) rules

Interested in the depth of the ruleset today. Been focusing in on TTT MB (The Two Towers).
You achive it simply by spelling K-E-E-P with the bottom lanes to light locks, then lock three balls on the sword.  Easy? It's more complicated than you think!

Some of this is my own explanation, adapted from the excellent ruleset writen by metallik on RGP:
  1. Lock insert is solid when a lock is lit, flashing when TTT MB ready (it's flashing for the 3rd lock). There's not always 2 balls locked on the sword when this happens!
  2. If setting is EX-Easy or Easy:  Locks can be stacked, meaning multiple K-E-E-Ps can be completed before locking a ball.
    It does this on the first TTT MB, and the ball saver gives the balls back if you haven't scored a Jackpot.
  3. On the next TTT MBs, you can't stack locks. You *must* lock a ball before the next lock can be lit.
    Always true if Feature setting #4 is MODERATE or higher. 
  4. During regular play, if all four letters stay lit, it means you must lock a ball before the next set can be collected.  On the first TTT MB if all four stay lit, that means you have all three locks qualified. It looks unusual when playing, but that's just the way the game rules work.
  5. K-E-E-P letters can only be collected during normal play - a multiball saves the state and prevents any more letters from being collected.
  6. On later TTT MBs (4th TTT MB or if LOTR Feature adjustment #4 is Extra Hard) KEEP letters will toggle with every rollover.  Meaning if you have letter "K" lit and roll past it, it unlights.  You hear the same "arrow thunk" sound as when draining down outlanes when you lose a letter. Cool effect.
THE TWO TOWERS LOCK DIFFICULTY:
LOTR FEATURE ADJUSTMENT #04

  Setting   Locks  K-E-E-P  Lane Memory  Locks Stack
  EXTRA EASY None Lit 2 Letters Yes Yes
  EASY None Lit 1 Letter Yes Yes
  MODERATE None Lit 1 Letter Yes No
  HARD None Lit 1 Letter No No
  EXTRA HARD None Lit 1 Letter Lanes Toggle No

Note: This adjustment controls how hard it is to light locks.
Default is EX-EASY. Information above is taken from the game manual. Software revisions may modify this in future.

A funny thing I observed:
You can get ALL the K-E-E-P lights frozen solid and they stay on even when all the other lamps other go dark.  Both GI and controlled, for “Path of the Dead” or any of the other modes.  It cleared after scoring TTT MB (The Two Towers).  Then you are back to no balls locked and no K-E-E-P lights lit and plays normally from there. I have also seen that at game over the attract mode will clear locked K-E-E-P lamps. So the CPU is KEEPing (ha!) them lit.  If it's a software bug, setting LOTR Feature #4 to MODERATE (or higher) hides it.

Perhaps it was the first time I had ever qualified for TTT MB, by stacking the 3 locks but without locking a ball? (See 4th bullet point above). A weird effect you get from holding the K-E-E-P lamps on when a lock has been pre-qualified.  Any one else seen or understand it?

Finally a possible software bug:

My LE game has the latest CPU ROMs v10.02, as delivered from factory Dec 2009.
I noticed that when the LOTR Palantir awards a "Spot K-E-E-P letter" it doesn't add one. You get the display, but a letter doesn't get lit by the Palantir.  Maybe makes earning locks harder, or a feature not implemented correctly?

I have written to Stern and am waiting to see what they say. Got first reply 19th April 2010.  To "check the lamps #1-4 were lighting in the single lamp test." Yeah, they are and the lamps all work exactly as they should.

Made a Shire protector for the wood siderail

Here are some pictures, including a pic of my LE apron with a left side replacement decal. See: 26 March.

Not a huge fan of the PoTD diverter mods, so first I added the pinbits protectors to top/bottom of Arwen plastic and at the bottom of the shire hole.  Noticed after ~500 plays that the wood rail on the side of the Shire hole was taking hits and getting dented.  So I have fabricated my own protector.  Top dimensions are 4 3/8" x 9/16" cut from the bottom of a clear CD case.


Avantages are a moulded edge and a lip that fits snugly over the rail. Also a new CD case has a good finish and will be fairly durable.  Cut it to size with a hacksaw and then finished up the cut edges with #400 grit sandpaper.  It's held in place by a drilled hole for the metal post at the front and (uh-huh) double sided tape to the wood rail.  Works for me.

9 Apr 2010

Orbit Diverter Pin

Orbit Diverter Pin fix is thanks to a post by MHS on RGP :
"You can also put a washer or two under one of the screws underneath the playfield holding the post diverter behind the orthanc tower to tilt the diverter forward father into the lane and make it more effective.  (Solves the problem of right orbit shots during War of the Ents coming back around the left orbit to the flipper.)"
Armed with this information, here’s what I did:
Took off the orbit pin diverter (3 screws) and then adjusted the stop so it was up a bit more. It was factory set to be below the height of the playfield. The screw post was glued (or held with locktite), so the only way move it was to add an 8/32 locknut to the bottom thread. Tightened it against the original nut which I had backed off to my adjustment point. Then I could screw both nuts back in place. Just left the locknut there.

Putting the diverter back, I added a small washer (as suggested) under the screw farthest forward towards the flippers to angle the diverter as above.  Tip:  I have also read on RGP that a "post bead" (like under the GI sockets) works well and makes it more adjustable.

You need to check that the diverter is not binding over the length of the full stroke, by activating it by hand. Also check that the "orbit pin" works from diags:coil test #13 with the playfield down,
as the coil plunger tends to bind on the harness wires on my LE game.

I got asked this question before and suggested to try tweaking the rollovers / when switches activated. I did warn not to change anything if it was working (at all) as it might get worse.

Maybe sometimes it's a ball speed problem, where the ball is just travelling to fast to be stopped by the orbit pin. But that's a guess. ested in the depth

This seems to be a better solution to the problem.  My orbit pin never worked correctly from factory, but seems to be working as it should now.
War of the Ents shots can be made from both orbits correctly.
Don't need to use the "front door" of Orthanc to score a hit anymore.  "Release the Dam"!

5 Apr 2010

Backed out more mods: Sword lock.

Seem to be backing out changes I made! Removed the extra rail on the left of the sword lock.  My wife was complaining that it was shifting on the axis of the hole in the middle, and causing a ball hang and search.

I confirmed that the double sided tape was starting to let go. One possible solution would be to drill holes (don't like doing that) or to stick it in place more permanently with epoxy or museum putty.

Removing the extra guide completely and bending the ball lock coil bracket slightly left, which I was told (by Steve Marsh again) seems to work just as well so far.  Sometimes simple is best.

31 Mar 2010

Removed some mods, added Ringwraith RED LED Flasher

Been busy elsewhere lately, main change was to back out some of the green #44 bulbs I installed.  Removed 4 x green bulbs under the slings, and the once under Arewen's face.  Would look good with the trees plastic, but made Arwen look like a martian!

Put a Red LED Flasher behind the Ringwraith. Game is playing well with no problems.

26 Mar 2010

New Left Apron Decal Women of LOTR

Replaced the left apron decal with a picture of ringwraiths (5th link down on the left) from this excellent site. (The link 10 down is fun too Van Halen 'Jump' + MAME).

Printed it out actual size, using best quality with glossy premium photo paper.  Cut out and stuck over the original decal with tiny blobs of Museum Gel, which should be removable. Perfect.
Provided on the site are decals of a Felbeast and Mt. Doom. I'm really happy with the result.
But don't get me wrong about the Women of LOTR, first look at the images.
Installed 9 of the #44 green bulbs made yesterday: 4 x GI sockets along the left side of the PF, 4 x GI under the slingshots.  Wiped the tip of one bulb clear before drying, went under the ring ramp.

Green glow on the left now and more golden on the right.  Need to play some games this weekend to see what I think, not sure about the slings but the rest is good on first impression.

25 Mar 2010

Replaced the Shire VUK switch,

Replaced the Shire VUK switch, part number 180-5116-01. Spec on side of switch says Cherry .1A 125v E63.

How to remove the Bottom Left VUK coil and bracket from under the PF (playfield) to change the "forked switch":
  1. Take out the two largest bolts first, using a cross-head (phillips) screwdriver on the top and 11/32" nut runner (or socket) on the bottom..  Remove the metal VUK "arch" from the top of the playfield.
  2. Remove the two lower wood screws (1/4" drive) leaving the one on the corner near the T-nut.
  3. Supporting the Coil Bracket, remove the last 1/4" screw.
  4. Unclip the connector from the coil and VUK.  Remove coil and bracket assembly.
  5. Microswitch small screws are 3/16".  As before, to remve the switch right you need a nut driver (or socket) that size.
You should be able to slide the heatshrink tubing all the way up the wires, solder on the new switch and then slide them back down in place. If not, use new heatshrink tubing.
Assembly is above steps in reverse. Test in switch tests and throwing a ball in there in attract mode. Job done.

Noticed that a ball had hung on the bottom Legolas ramp for another player when struck very lightly.  Caused a ball search and "chase ball" to be served.  I had seen this before, so while the PF was up, I tightened three 11/32" bolts at the bottom of the habitrail.  One (on right side) seemed very loose, which may fix it. (didn't work)

Put a #555 bulb-style color changing LED in the Palantir Insert to try there.  Seems to have a different flash rate to the Palantir LED.

Dipped 10 x #44 clear bulbs (recovered on 23rd March) in "GlassART Light Green" to make green bulbs.  These are for GI along the left side of the PF and under the slingshots.

Re-wrote a comic strip on Monday to be more about me, although the drawing is not mine.  Called a mash-up.  Had an argument with my wife (we are usually compatible, even on pinball related things).  I got angry, took a (D-ahem)Gilbert comic and had fed her to the Pinball Orcs by Wednesday.
Enjoy!

23 Mar 2010

GI Colored Bulbs a "How To"

Installed 10 x #44 yellow bulbs
P4P order arrives including the VUK forked replacement switch, I like that description as in "Your VUK switch is forked, get a new one"!
Also 10 yellow #44 bulbs from P4P which were an easy fit: 9 along the shooter lane for the controlled lamps that "strobe" in sequence.  The other bulb is a GI further in under the sword lock.
Planning to change the sword lock flasher for an amber/yellow bulb.  Once I figure out how to do it without taking the whole sword ramp apart! An LED flasher would be better there, too.
Update 25 Mar 2010: I did this with fingertips from each side, but it's not easy.  Now an Amber/Yellow #906 flasher.

  • Tip: Change G.I. bulbs from the underside more easily without taking apart slingshots or plastics. Use a small power screwdriver with no bit, the 1/4" drive is exactly the right size.  Stern put in black "post beads" which act as gromets to hold the screws in place.  All these tips work on other games.

I usually make my own colored bulbs with "Marabu GlassArt" glass paint, but didn't have any yellow. It's for painting vases or lightbulbs,
a guy called "Modding Stan" in the UK taught me how. Use a clothespeg to dip them, hold glass bulb downwards and wipe the excess back into the jar.  Hang them over the side of a table with a weight on top of the peg, glass bulb down.
Wipe any excess with the edge of a kitchen towel before it dries if it forms a drip. Dry for 24hrs and done! Lots of green ones on the GI of my AFM, better for GI than LEDs as the triacs dim them up and down right.

I use the following colors ( from www.artdiscount.co.uk probably available near you, too)
  • Green Bulbs - GlassART 50ml 463 Light Green
  • Red   Bulbs - GlassART 50ml 434 Bordeaux
  • Blue  Bulbs - GlassART 50ml 498 Turquoise
  • There is a Yellow (420) and a Lemon (421) listed but I haven't tried them.  The darker of the two is Yellow.
    A 50ml jar costs £3 in the UK ($4.50) and does a lot of #44/47/555 Bulbs or #906 Flashers!
PinballPal Stealth protectors for cabinet and playfield arrives.  Mylar protectors fit nicely around the Start Button and Flipper buttons.  I also like the extra lockbar foam strip with the leg protectors, as you can get wear on the brass siderails and cabinet paint under the lockbar without them.

After working on the game, I had other things to do!  So I didn't get around to fitting the Shire VUK or playing any pinball today. :(

20 Mar 2010

Palantir Glass Ball, Backbox Warming Filter

  • Left VUK switch does need replacing ASAP
Still not registering 100% and have to wait for ball search. No part yet. Replaced a #906 Flasher behind the ring.  They don't last as long as in my other games, is this caused by vibration?  Impact when the playfield bumps back into place from the extended position?
If so, it really needs a spring loaded hinge. Tried a Yellow #906 Flasher bulb behind ring, but couldn't see much difference.
Should order a "9FLUX Super White" or even a "9FLUX Matrix Amber" LED flasher for there.  Maybe Amber Flashers for inside the ring and below the sword lock would look good.
  • Fitted a Palantir glass ball that was sent to me as a gift by Steve Marsh, a fellow LE owner in the USA.
He buys the 30mm globes from Christalier in Washington 98002 (the State WA).
Best things about this mod: Inexpensive, perfect size, easy to fit and no more screw threads in the Palantir! With a colour change LED behind it's bright!
Leon's site shows fitting the globe, so follow his steps.  Fairly sure that site is by Leon Borré based in Belgium, we've been using his “Pinball test ROMs” for years!
Can't read it in Dutch, but Google can (almost) translate and it says screw threads "It is like an ugly worm in an apple"  Nice one Leon! A fantastic mod idea.
  • Next up, the PinballPal backbox warming filter finally arrived and was easily fitted in minutes. Spent more time taking the pictures of it! Thought a backglass wouldn't need a filter, but missed the difference between backglass bulbs (lots of #44s) and a Stern fluorescent tube. The gold effect now looks way better with the warming filter.
Used one of the supplied "film gels" to get the warming effect I wanted.  Worth the $10 + shipping.  It helps tone down Korn's famous "black outline" and "HD" effects, if you follow that.  If not, Google rec.games.pinball for HD and then regret reading it forever.

Both mods fitted on my game.
It's very hard to take an accurate picture of the blackglass and warming filter, and looks much better in person. I'm using a single "film gel". Enjoy!

17 Mar 2010

Left VUK (or Shire) switch has issues

Noticed a few times the VUK switch was slow, waited for a ball search in multiball to kick out of Shire. Wife played it and complained about it too, she's a better game tester than me. Less forgiving if it goes wrong. Sure enough, I watched her get 3 balls all stacked up in the Left VUK until a ball search.

Switch wasn't sensed at all in the diag switch test, even though I could hear it click. Took apart game to get at switch, which is not fun. You have to drop the VUK mech to get at it. The switch wasn't working on "N.O. and press to close". But it was working on the "N.C. and press to open" side. Strange. After messing with it on a DMM set to buzzer, it started working again as it should. Put it back on the switch matrix and it was fine. Put it all back together and it works. Have ordered "2 x 180-5116-01 Stern Fork Switch VUK" from P4P*. I pay GBP £5.40 a switch in the EU, so double the USD $4 that Pinball Life charges. I need to have a replacement, as this switch will get flaky again at some point.


Tweaked the sword ball lock mod I made on 10 Mar 2010. The 2nd locked ball was resting on the wireform and not rolling down the sword correctly when released.
Drilled another hole about 1" further down from the top of the lock shield for the wireform to go in. The idea is that the wireform sits on the lock shield closer to the right angle turn.
The hole is around 3/16" from the edge, a bit closer than the original mounting holes. This gives the balls more clearance and moves the guide up the sword.
Rounded off the edges on the base at the top. It's still held by the wireform and double sided tape, but now more from the middle. This seems to work as expected. Update: This extra original ball guide was removed on April 5th.   It works fine with one when set up correctly.


Put the correct swords on the figures, and posed them. Noticed that the example slideshow quoted in 11 Mar 2010 has the Merry and Pippin facing the other way.
On my game they have their backs to the inlanes. My wife thinks I'm like the "40 year old Virgin" will the AOME collection action figures!

13 Mar 2010

Birthday wishes do come true. Game is repaired.

Game behaving as it should, not changing stuff today too much on my brithday! Will stay away from boards if at all possible.
Did confirm that the Orbit pin coil is getting fouled by the wires running from the backboard /playfield to the head. Found that some rerouting and tucking them back under the playfield before putting it down stops this. Must remember to check fire the orbit pin from Coil Diags each time I close the playfield.

Only mod today was to add 2 GI Red LEDs, one by Orthanc where it was shining in my eyes- you get the red from the optos there anyway.  I also put one under the ring ramp.
Note: These LEDs have since been removed and replaced with #44 colored bulbs on 26th March.
Another good tip from Steve Marsh is to unscrew the lamp sockets from underneath:
"I think the yellow bulbs along the back and under the ramps, and green bulbs under the slings and along the left side (incl. under the left ramp) really look great. Bulbs are easy to switch by unscrewing the sockets from below. Takes seconds with a power screwdriver, and each socket has a rubber grommet holding the screw to the socket."
I ordered some yellow #44 bulbs today, I have the glass paint to make green ones.

12 Mar 2010

OMG Maybe the worst week for my LOTR LE so far. Worst day was today!

Don't want to admit these even happened, but...
I'm going to push on and document this as it's a game log including all the gory details.  Maybe it will help someone else some day. Won't get "Bored of the Rings" at this rate, just tired.

Playing a game and the diverter in front of the Orthanc tower stuck and wouldn't return.
  • Looked under the playfield at flipper mech that Stern used, ugh!  Spring didn't appear able to return the gate to "home". 
  • Mechs including links and plunger did not seem to be binding.
  •  Took the coil stop out and removed the coil and had a good look. Everything still looked new, so put it back together.
  • Got a hex key set and followed instructions to adjust the "Diverter Gate" properly, in the inside front cover of the LOTR manual.
  • Also in Service Bulletin #147.  Working correctly again.
I noticed that the orbit pin was never working when playing a game.  Found out later that this is a common problem, and not just from binding.
  • Suspected that during the mode "Ents go to War", when you take the Right Orbit shot the ball should land in the back of Orthanc.  Makes sense.
  • In fact I couldn't think of a single time that the orbit was stopped by that pin coming up. So I watched it with someone else playing, not happening.
  • Next, game on diags coil test and pulsed the orbit pin coil #13, got a very weak result. It seemed to be trying to push the pin up.
  • Open backbox, grounded the transistor for that coil (Q13) same weak result.  Put the playfield up and pushed the coil by hand. No problem moved freely.
  • Tried to ground the coil, with the playfield up.  The pin extended fully. It would also coil test correctly, but not with the with the playfield down. 
  • Had correct voltage on the coil at both sides all the time.  I had continuity from the transistor to the non-power side of the coil on the BLU-GRN wire.


    My theory is that the copex (plastic sleeving) containing the playfield wires running from the backbox was fouling the coil action. 
    Rearranged those cables and now the pin fires to full height with the playfield down. Game finally happy?  No. It gets worse.

    Played a game and the diverter gate was fine, and even the Orbit Pin seemed OK. But had scoring coming from the PoTD when no ball was there.
  • On the first ball, it collected 5,000 souls mostly 100 at a time. Gimli said "That's an army!" right away.  Stopped playing and started looking at the PoTD switches.  They seemed OK.
  • Vibration? Went to active switch test, PoTD switches seemed OK to me.  Banged on the PoTD, didn't seem to be the source of the fault.
  • Realised that when the spinner was closed, all the switches in that ROW were made. Took the spinner switch off the ramp, unplugged below and removed it from the game to test. You have to close a micro-switch to test the diode, or take it off the switch. Diode and switch both tested OK, put it back on the ramp checking for shorts to ground.
  • Did some more switch tests, and found the same was true for ANY switch in that column (COL 7).  Including plumb bob tilt. If you closed, say the Left Bumper skirt switch (ROW 1, COL 7) then all the switches in ROW 1 lit up as being made. So that meant all the pop bumpers and the spinner were scoring PoTD hits.  Hmmm... not good.
Here's what to do next:
  • Remove CN5 (COL Drive) and CN7 (ROW Return) from the CPU board.
  • Power up the game and go into switch test, active switches.  The whole Switch Matrix should show blank.
  • Take a jumper cable and put a diode at the end.  The banded side of the diode points to COL Drive so attach that side with the jumper to CN5 pin1.
  • Touch the NON-banded side to pins 1-9 of CN7 (ROWs).  You should get an indication of a switch closure for COL 1 at the ROWS 8 to 1 for each pin you touch.
  • Fine for me until CN5 pin 8 (COL 7), which I feared.  As I touched each row pin ALL the switches in that ROW were closed.  The problem was on the CPU and not the playfield.
If this test is perfect, then start looking for shorted switches out on the playfield.  Shorts to ground or between COLumns would be likely.
  • Next I took a logic probe and connected it to +5v and Ground.  Touching the probe to each of the pins at CN7 you should see "High" (not pin #10 as this is not used).
  • Touching the probe to each of the pins at CN5 you should see a pulse.  But my pin 8 (COL 7) was "Low".
*** WARNING *** If I was not 100% sure of the fix and my ability to do it, I would have sent the board to a repair person.  Or back to the Stern Distributor.
Because I was the probable cause of this fault (yes, I'll get to that embarrassment shortly) and being fairly good with board repairs, I went for it. YMMV.
  • The fault was looking like Q7 (a 2n3904 according to the manual).  I took the CPU board out of the game and measured continuity between the outside legs (C-E) of Q1 through Q8. Only Q7 was shorted.  Found an exact replacement for the 2n3904 in my spares(!) - Clipped it off the board, desoldered the legs and replaced it.
  • After dinner, put the CPU back in the game without connecting CN5 or CN7 and repeated the switch matrix test with a diode and jumper. Tested perfectly.
    Turned it off and replaced the connectors for CN5 and CN7.  Need a complete shake-out game, but the switch matrix is good now. Didn't even loose the settings or high scores.
I figured out what I could have had done.  D'OH!  Looking for a place to test ground the "orbit pin" coil, I picked the worst place.  Connected the jumper to the frame of the plumb bob tilt.
  • It looked like a black wire on it. I could try and blame the dodgy wiring colors Stern used for the LOTR LE.  But it was my mistake.
  • Grounded 24v DC (or so) through the Switch Matrix!  Looking at a switch wiring diagram later, it went back through CN5 pin 8 and shorted out Q7. Thank goodness it wasn't worse.
Tomorrow is my Birthday, would be cool to be able to play the game at my party with the figures on and most of the mods completed. It's still possible.

11 Mar 2010

Fitted Plastic Figures to my LOTR LE game

The LOTR LE did not come with AOME plastic action figures, the earlier versions of this Stern Pinball game did.  I wanted to add back all the original figures to my game.

Finally went ahead and fitted the figures with a Pinbits LE mounting kit. Very much worth the $15, some of the plastics are not needed on an LE (* means duplicates of the small ones included in the LE "goody bag". As some folks like to leave the goody bag intact, it's a nice touch. I got in my Pinbits set:
  • 2 x sling protectors with the holes cut for Sam,Golum,Frodo (right) and Merry,Pippin (left),
  • 4 x Clear washers, there are very important as I found out the hard way.
  • 5 x small circle mounts (the original plastics if you are using cable ties) #28(S*), #33(G*), #31(F*), #28(M*) and #28(P*).
  • 1 x Mount #39 (* Ugluk Uruk-Hai with sword and severed Goblin head). Stands at the back next to Barad-dur tower.
  • 1 x Mount #50 Long pointed mount (* Mauhur and Uruk-Hai with Helmet).  Stand along shooter Lane.
  • 1 x Mount #36 Mount for Ringwraith. 4 x Cable tie holes for base of figure.  I replaced existing plastic with this one.
  • 1 x Mount #?? Clear plastic for mounting Gandalf behind Balrog.  You may need to ask Pinbits for a "Gandalf on Shadowfax" clear plastic if you need that.
On to the fitting, no real problems others have documented with Pictures.  Closest to what I did is in the middle of this slideshow.
Cable tied Saruman, Ringwraith (Dark Rider), Aragorn and the Ugluk Uruk-Hai.  When it came time to fit my Gandalf on horseback, just couldn't find him.  Must have hid him good, so used Gandalf the Grey standing for now. Just like the story, guess he's off fighting the Balrog.  When I'm good enough to defeat the Balrog, Gandalf the White will return on Shadofax and will belong on my game.  Funny how life imitates art.

Two points worth a mention:

  1. Left the little swords off the characters on the slings, and Saruman dropped his staff right away.  Waiting for some "4 oz. museum gel" to arrive and don't want to lose the swords. Amazing stuff! One of the brands is called Quake-hold, because collectors use it to hold down glassware in case of an Earthquake.  It holds fast, comes right off when you need it to. Steve Marsh advised me that he is sticking many of his figures down with "Museum putty"- a similar product.  Army of the Dead to the PoTD, and even figures on top of pop bumpers!


  2. Didn't put the 4 x washers that came in the pinbits set.  Already put clear plastic defender washers under the sling plastics when the metal ones were removed.  So I didn't need them.  Big mistake!

Half way through the first game after my figures were added, a sling arm stuck out. I thought a coil had "locked on" and switched the game off.  Looking underneath, I could feel it was binding.
But it took a while to understand that the feet of the figures were pushing down on the sling plastic.  The sling kicker was binding on the screened plastics! ARRRGH!  Fitted the 4 x washers between the sling plastics and pinbits mounts.  Didn't crank the nuts down as tight as before.  But now I have some lovely "lines" on my screened plastics where the kickers rubbed.  Not getting new LE slings in a hurry, so  will have to live with it.

What I like about the figures.
They really help tell the story, especially the Ringwraith was missing from his platform.  What was the point of the flashing Red light without a figure there? I also like Aragorn charging at the Uruk-Hai warriors,
and the funny shaped plastic on the shooter lane that makes sense next to the horse's leg.  There probably are other points of interest, but overall it ties the game together.
Haven't fit any figures that weren't factory (yet).  But there is a Ringwraith standing in my spares, he might look good somewhere... :o))

10 Mar 2010

Sword Ball Lock changes

Found that the balls were falling off the "original" sword lock too much in play, especially the first ball locked. (After that they seem to settle in behind the 1st one).

Found a solution that keeps the look of the sword, without putting the "hooded ball lock guide" back on again.  The solution is to use another "original ball lock" (buy for $7 from Pinball Life below, or make one very similar if you are handy with metalwork.

It goes on the other side and further down the sword.  One of the holes is held in place by the metal habitrail, the other side by double sided 3M tape along the bottom.  I couldn't bear to drill though my sword to locate it like the one on the other side.

My mantra is that any mod needs to be able to be removed by a new owner if they want to put the game back to original. Here is a picture, this change looks cleaner from the player's viewpoint.
Note: *This was updated later, first the extra guide was moved up the sword, and then removed on April 5th.  Two guides slows the balls down and isn't needed if the game and lock is set up correctly.

9 Mar 2010

Ring Magnet Fuse Answer from Stern

  • Ring Magnet fuse value discussed in #4, #5 and #8

  • Got the following answer from Stern today, 5A SB is good to leave in F7 on my LOTR LE:

    Hello Richard,
    I was just informed by our engineers that fuse # 7 should be changed from a 4A Slo-Blo to a 5A Slo-Blo.
    Please let me know if you need further assistance.

    Regards,
    Pat

    8 Mar 2010

    Fitted the Cliffy Protector Set today

    Started to take off the mirror and plastics behind Barad-dur tower on the right, until it became clear to me that the hole protector was for the long Orthanc tower hole.  D'OH !

    Corrected my post above for 4th March which talked about Barad-dur.  Not too hard to fit, spent more time putting the plastics and mirror back on that I took off by accident.

    Fitted the other one for the "Gilmi" VUK, needed to take off two posts behind the Palantir.  Uses some 3M adhesive between the front lip and the playfield.  They fit well, and I hardly notice them.

    4 Mar 2010

    Replaced the hooded "Sword Ramp Ball Lock Guide"

    Replaced Ball Lock with the old style type (LOTR 2003).  
    Bought from Pinball Life, see links above.
    Dropped a screw way down inside the playfield when fitting it, had to fish for it.  Played a game or two, once I got it sorted out.
    • Does make the sword look better, after being used to the hooded guide.  Already had one ball fall off the sword instead of locking and go SDTM, so I understand why it was changed.  But maybe you have to learn the "touch" of locking a ball.  I'm not sure about this mod yet, more testing tomorrow.
    • Was thinking that some folks buy all their mods at once, and fit a bunch of bling before ever playing a game.  I'm from the other school, play the game try something out. Play some more, try something else. Probably add the Cliffy protectors for the "Gimli/Gollum" VUK and Orthanc tower hole next.
    No wear now, adding Cliffys means there will never be any.  Last items to add are the figures and a shaker motor. Not adding a topper or under cab red lighting.  As we say in the UK, that's over the top!  (topper, over-the-top see what I did there?) You have to draw the line somewhere when adding mods.

    27 Feb 2010

    Clear plastics

    Ball was catching on the clear plastic square over hobbiton shire hole, as it came down the LH wire return ramp. Took plastic off for now as others wanted to play pinball!
    *Sunday 28 Mar 2010* Added two 6/32 nuts to the tops of the metal posts, between posts and plastic. Note these are not locknuts, but slim normal ones.  Possibly the plastic is taking ball hits on the top. Or the hex posts are not mounted correctly from factory, one looks askew.

    Installed Pinbits "9 piece LOTR protector set" Very nice and was easy to do - even without instructions.  Finally have protection top and bottom of Arwen plastic and for the two VUKs.  Needed this from the beginning.
    *Sunday 28 Mar 2010* Took pinbits plastic off from behind the Balrog.  Was longer than existing, and the fork shaped end was fouling the "Balrog closed" switch.  Didn't do this when first installed.
    Can't see the advantage of having it there.  I have spare plastics, except for Arwen.  Plan to will deal with both of the clear plastic issues (item 12) later when adding the AOME figures.

    21 Feb 2010

    Flipper adjustment settings and the Coil Pulse Power

    Been reading about flipper adjustment settings #53-55, and the Coil Pulse Power Setting #33
    • Essentially the coils can get hot in a long game, so need to be pulsed less and switched to the "hold strength" quickly to keep them cooler and therefore stronger. An update around v8 to the CPU code implemented these settings, warnings not to adjust these settings so nothing was changed there.
    • Made a change to adjustment SPI #33 (Coil Pulse Power) today, changed from Normal to Hard which is a 12.5% increase. It does seem more lively kicking the ball around, like using Hi-Tap on an old EM. Completed DTR in 30 sec on this setting, with the 1 ball DTR setting. Not convinced the coil strength makes a difference, once did 37 sec without any changes. So it's going back to the Normal setting. Don't understand the relationship between this and the flipper coils, but can see it isn't needed on a new game. Seems to get hammered enough on Normal.
    Reached "There and Back Again" after going back to the Normal coil strength. Was concentrating on the Ring Modes and not on getting to DTR. You qualify for the "Movie Multiballs" anyway when playing for the Modes. As an example: War of the Ents tends to qualify the RotK MB, because you go to the PoTD over and over while hitting Orthanc.

    I really like the music during TaBA, very soothing and a nice sound when you shoot the ring. I won't spoil it for you if you haven't reached it yet, but a nice addition to an already excellent game. I can see how really high scores are possible.